Integrate Formidable Forms with your Salesforce account with the WordPress Salesforce integration plugin. Add the data submitted from your WordPress forms as Contacts or Leads in your Salesforce account.

You can send data to any custom object in Salesforce. Custom objects allow you to save extra data to Salesforce that is collected in your form, but isn't standard on the Salesforce side. These serve as custom database tables that allow you to store information unique to your organization. This includes accounts, announcement, assets, campaigns, cases, groups, contacts, contracts, email messages, events, ideas, leads, notes, orders, products, tasks, goals, and more.
Download and Install
You must have API access to your Salesforce account to use this integration.
- If you haven't already, install and activate the current version of Formidable Forms Premium on your WordPress site.
- After confirming your Formidable Forms license, proceed to the Formidable → Add-Ons page and toggle on the WordPress Salesforce integration plugin.

Integrate Formidable Forms with Salesforce
Before initiating the Salesforce integration, you must save the Consumer Key and Consumer Secret Key in your WordPress dashboard to allow Formidable to communicate with Salesforce. To obtain these values, follow the instructions below.
Step 1: Create a Salesforce app
To get the Consumer Key and Consumer Secret key, you must create a connected app in your Salesforce account.
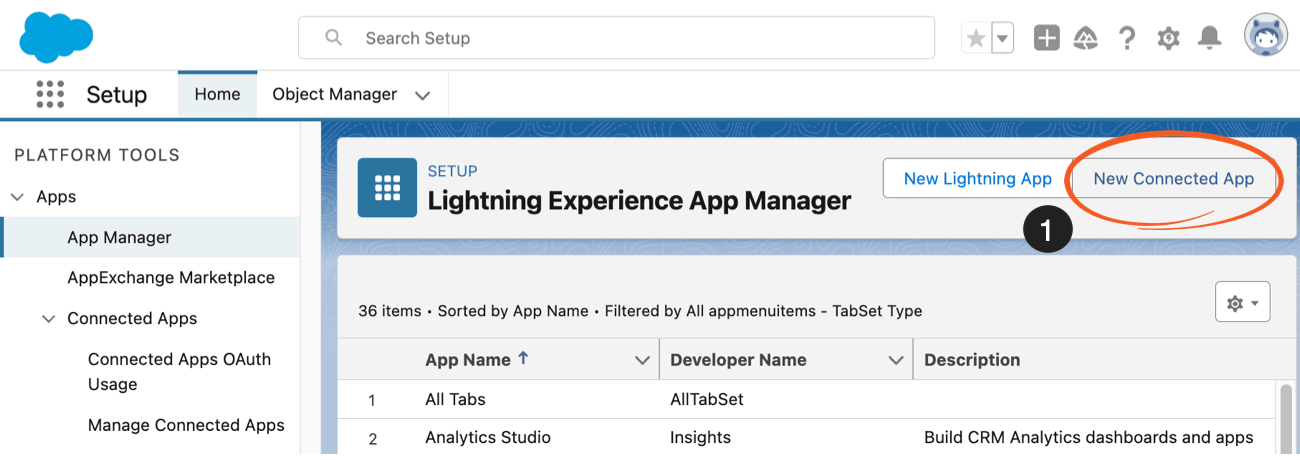
- Go to Setup → Platform Tools → Apps → App Manager in your Salesforce dashboard and click the New Connected App button.

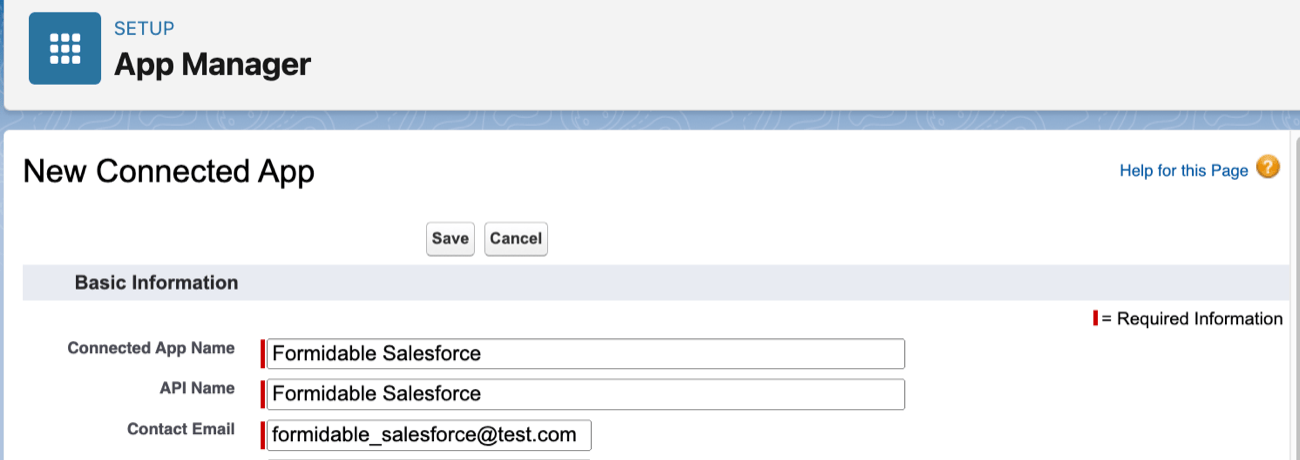
- Fill out the required Basic information:
- Connected App Name. Choose a unique name for the app to be visible to Salesforce users.
- API Name. The API name is automatically filled out based on the Connected App Name, but you can modify it as desired.
- Contact Email. Enter the email address of the user creating the app.

- To start configuring your app’s permissions, select the Enable OAuth Settings checkbox under API (Enable OAuth Settings). Insert the required URL in the Callback URL box.
https://login.salesforce.com/services/oauth2/success
If you are using the Salesforce sandbox, use this instead.https://test.salesforce.com/services/oauth2/success

- In the Selected OAuth Scopes section, this will determine what permissions will be allowed in your Salesforce app. Enable the following permissions by selecting each option from the left column and clicking the Add button.
- Full Access (full)
- Perform requests at any time (refresh_token, offline_access)

- After adding the permissions, uncheck the Require Proof Key for Code Exchange (PKCE) Extension for Supported Authorization Flows to allow Salesforce authentication.

- To complete the setup of the connected app, scroll down to the bottom of the page. Click the Save button and allow a few minutes for the app to work. Allow 10 minutes for changes to take effect before clicking the Continue button to view your API information.

Step 2: Connect to Salesforce
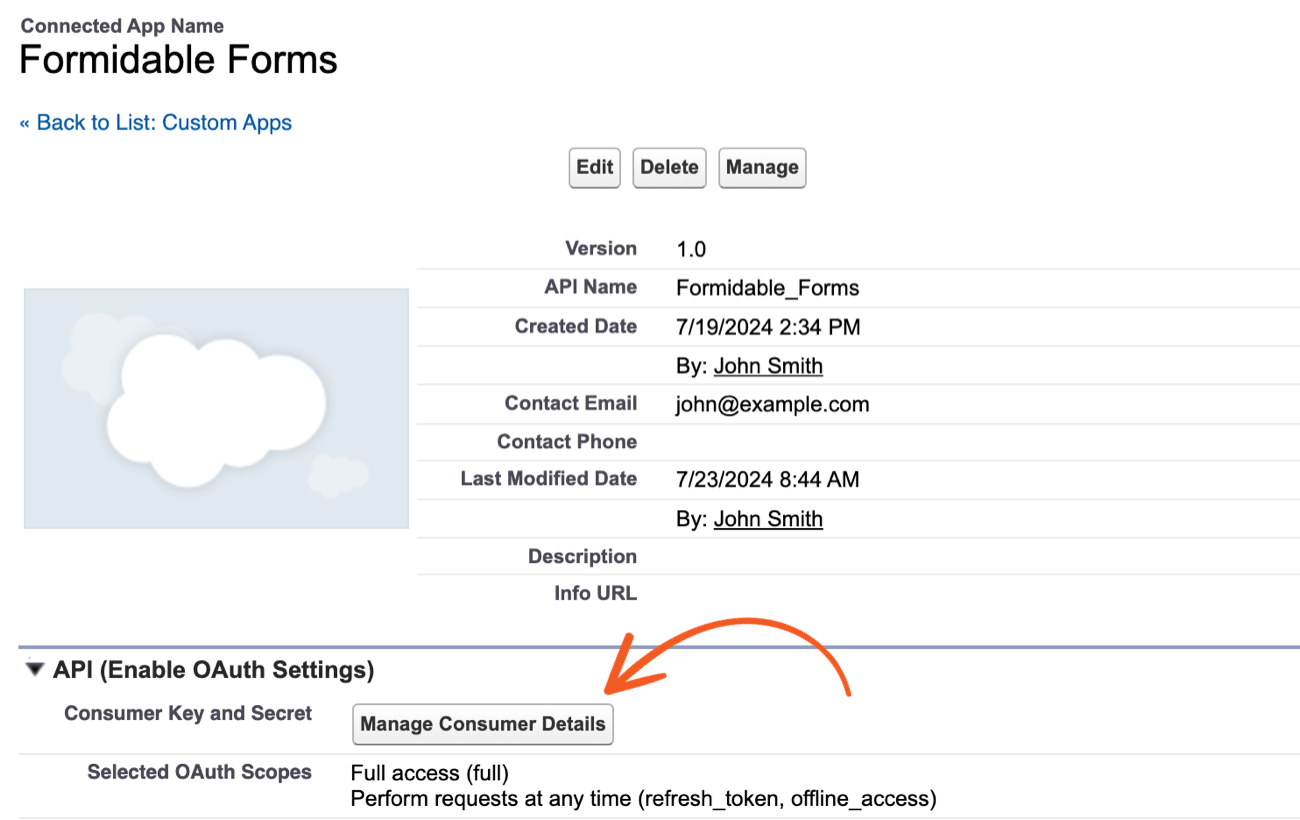
- Navigate to the page displaying your API details, locate the API (Enable OAuth Settings) section, and click the Manage Consumer Details button.

- Copy your Consumer Key and Consumer Secret Key by clicking the Copy button on the Consumer Details page.

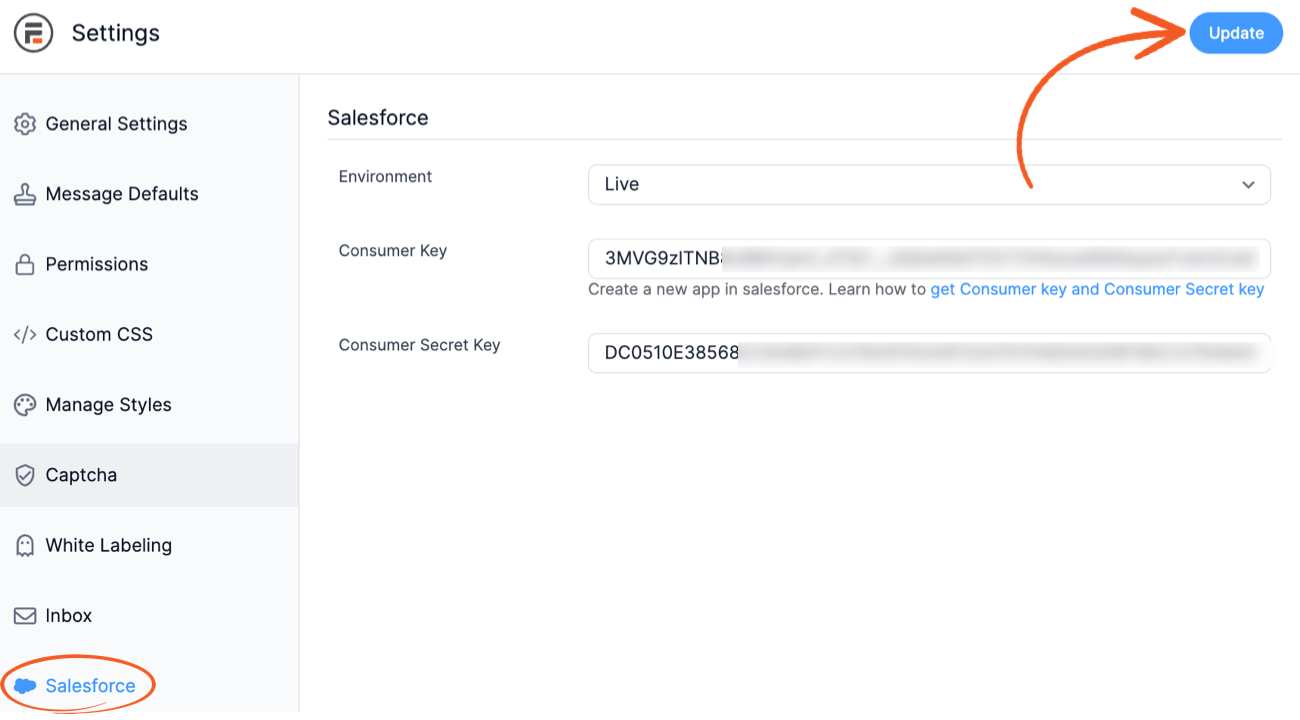
- Return to your WordPress dashboard and go to Formidable → Global Settings → Salesforce. Paste your Consumer Key and Consumer Secret key on this page, and click the Update button to save your settings.

- Once you have entered your Consumer Key and Consumer Secret Key, the Authorize button and Auth code field will appear. Click the Authorize button to start the connection.

- Next, a popup will appear, prompting you to log in using your Salesforce credentials. To finalize the setup process, click the Allow button.
- When the popup appears, it will show the Remote Access Application Authorization message. Look for ?code= in the URL displayed in the address bar. Copy the string of characters that follow this part of the URL, and close the popup.

- Return to the Formidable → Global Settings → Salesforce page and enter the given code into the Auth code field. Make sure to change the %3D%3D at the end of the code to ==. After making these adjustments, click the Update button to ensure your changes are applied.

- You're now all set to create your Salesforce forms! The Deauthorize button on the page confirms that the authorization process has been successfully completed.

Step 3: Create a Salesforce form
Now that your WordPress site is connected to your Salesforce account, it's time to create your Salesforce forms.
- If you haven't already, create a form to collect your customers and leads.
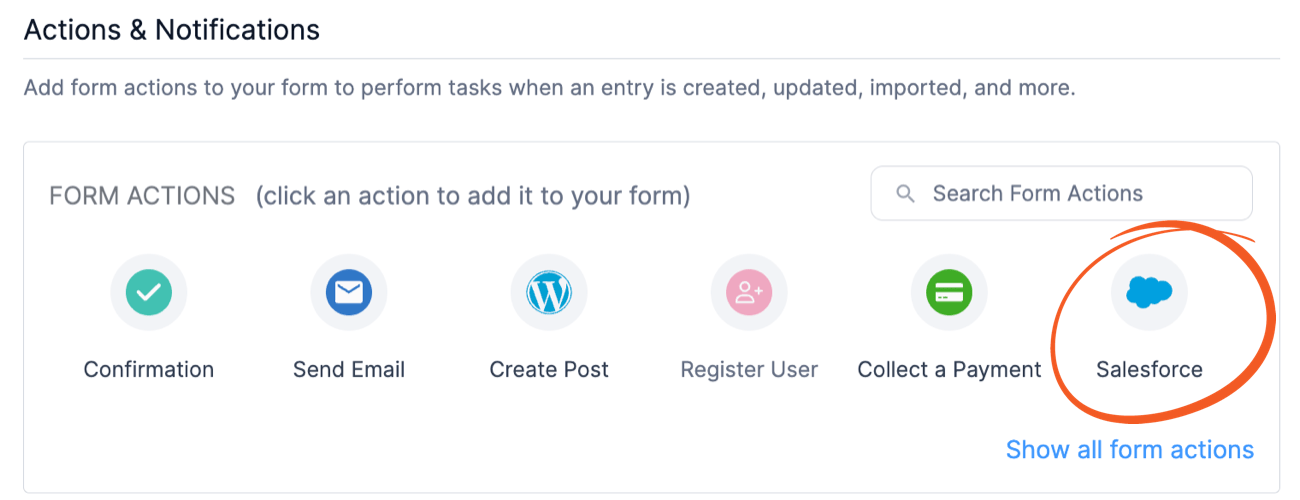
- To link your form to Salesforce, start by editing the form. Then, proceed to the form Settings → Actions & Notifications and click the Salesforce icon.

- This allows you to access the mapping settings for your Salesforce form. Begin by selecting the type of Salesforce Object you want to create, which could include contacts, leads, events, and many more.

- Selecting an object (Contact/Leads) in the Salesforce action will automatically retrieve all the relevant fields. Your current form fields will be available as dropdown options, allowing you to align them with the corresponding Salesforce fields. It's important to ensure that each required Salesforce field is mapped to a corresponding form field.

- After saving your changes and submitting your form, a new item should be added to the selected object in Salesforce.
Update an existing record
If you want to configure your Salesforce form action to update existing records as well as add new records, map the Update existing record by option to a unique field in your form, such as an email field.

Allow duplicate records
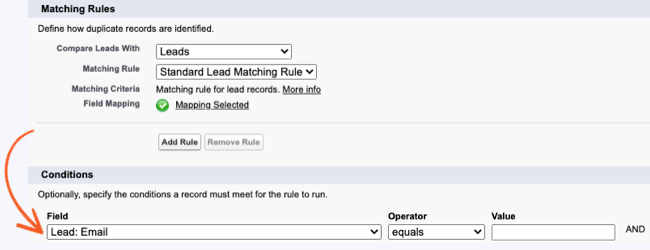
If you want to set up your Salesforce form action to allow duplicate records when a new entry has been submitted, you can customize the duplicate rules in your Salesforce settings.
- Use the Quick Find box to find Duplicate Rules.

- Click the rule name to edit a rule.
- For the object with a unique identifier (e.g., email address) to not get blocked, you can create a condition in your duplicate rule with Lead: Email EQUALS ______(leave blank). Leaving the value field blank will flag records for duplicate matching without the unique identifier.

If it’s not working, check if you have more than one active rule for your object. You can either deactivate the existing rule or reorder the rules.
Please refer to the Salesforce docs for information on how to customize the duplicate rules.
Limitations
- The Salesforce add-on doesn't currently support two-way sync. The information is 1-way from Formidable to Salesforce.
- File URLs can be passed to Salesforce, but the files are not sent.
- The Salesforce add-on doesn't currently support updating existing records by the object ID. It can only be updated by the fields associated with the object.
Salesforce field data types
These are the data types that Salesforce expects to receive when Formidable sends to an object in Salesforce, along with the most frequently used Formidable field type for it.
String
This field requires a simple string of text, typically using a Text or Hidden field from Formidable.
Textarea
This field requires a long text string, with or without line breaks. A paragraph field is typically used in Formidable.
Picklist
This field requires one of an enumerated list of values. For example, the options may be "Web", "Phone Inquiry", and "Other" in a Salesforce LeadSource field. The value sent to this field must be exactly one of the options specified in Salesforce.
Double
This field expects a number, with or without decimal. A number field is typically used.
Phone
This field expects a phone number. A phone number field is typically used.
This field expects a valid email address. An email field is typically used.
Url
This field expects a valid URL. A Website/URL field is typically used.
Currency
This field expects a currency value, formatted as decimal. A number or product field is typically used.
Int
This field expects an integer value, without decimal. A number field is used.
Reference
This field expects to be either left blank, or provided a Lookup ID of the correct object ID. For example, if it is Owner ID, then an associated Owner ID must be sent.
Boolean
This field expects a True/False value, either as "True" or "False", or "1" or"0". A Toggle field is often used.
Datetime
This field expects a date/time combination timestamp. A text or hidden field with a timestamp is typically used.
Date
This field expects a date string, without time. A date field is typically used.
Multipicklist
This field is like a picklist, but expects one or more valid options. A checkbox or dropdown field with multiple select enabled is typically used.
Time
This field expects a timestamp. A time field is typically used.
Troubleshooting
No options in the form action
When a Salesforce form action is added, it should include a dropdown filled with all the possible Salesforce objects. If this dropdown is empty, there is a connection error between your site and Salesforce.
- Make sure your Salesforce account type includes API access.
- Go to the Formidable -> Global settings page and click save. Do you see an error message about your Salesforce API key? If so, start with correcting the error. 'expired authorization code' is a common error message. In this case, the authorization code needs to be updated.
- If the API keys are all correct, and no error messages appear, return to the form action and click the "clear cache" button.
- After the cache is cleared, open the form action again. If an error message appears, take action to resolve it. For example, if you see an error message like 'The REST API is not enabled for this Organization', your Salesforce account will need adjustment.
- Turn on logging and check for any error messages. For example, if you see an error message like 'cURL error 35: SSL connect error', this usually means that the CURL version on your site needs to be updated. You would need to reach out to your webhost to let them know what the error message says.
Logging
To see messages after any API calls, install the Formidable Logs add-on and follow the instructions on that page.
Owner ID: id value of incorrect type
If you map an incorrect Owner ID in the form action settings, you will get a MALFORMED_ID error. The owner ID does not have to be mapped to a field, and can be left out. If you choose to include the owner ID, it must be the ID of a user on the account. Please refer to the Salesforce docs for information on how to find the user ID.
Required fields are missing
When adding a new Lead to Salesforce, there are a few fields that Salesforce requires in order to create the object. If any of these fields are missing, you will get a REQUIRED_FIELD_MISSING error, along with a list of the required fields that were left blank or not mapped to. These required fields must be sent in order to create the object.
Session expired or invalid
If you get the INVALID_SESSION_ID error code when sending an object to Salesforce, you may have strict IP settings enabled on your Salesforce account. Turn "Lock sessions to the IP address from which they originated" OFF, and select the IP relaxation policy "Relax IP restrictions". If that doesn't solve the issue, try re-entering the Salesforce auth code in the Formidable global settings.
Owner ID: owner cannot be blank
If you map a field to Owner ID but do not enter anything in the field when the form is submitted, you may get a INVALID_CROSS_REFERENCE_KEY error. Instead of mapping to the field and leaving it blank, either do not map to the field and it will populate automatically in Salesforce, or enter the correct cross reference value in the field.
No such column on sobject of type Lead
If you create a custom Salesforce field on a Lead (or other) Salesforce object, and map to that field in Formidable, but later remove that field from Salesforce, you will encounter a INVALID_FIELD error. In this case, go to your Formidable Salesforce form action, click the "Clear Cache" button, and make sure that is no longer mapped to in the form action.
Opportunities are not added
If Opportunities are not added to your Salesforce account, be sure that you have mapped the form fields to the required Salesforce fields. It should include the following: Opportunity, Name, Stage, Close Date, and Owner ID.
Cannot deserialize instance of currency
If you get the error message "Cannot deserialize instance of currency from VALUE_STRING value" when sending an object to Salesforce, you may be passing an incorrect value format. The value used should be in a number field as the amount and not formatted as currency.
Duplicates detected
If you get the DUPLICATES_DETECTED error code when sending an object to Salesforce, you may be sending a duplicate entry for the same object. In this case, you can either choose to allow duplicate records or update an existing record.
Missing required code challenge
If you encounter the error message Missing required code challenge, follow the instructions below to resolve the issue.
- Go to Setup → Platform Tools → Apps → App Manager in your Salesforce dashboard.
- Navigate to the App Name and select Edit from the dropdown.

- To allow Salesforce authentication, uncheck the Require Proof Key for Code Exchange (PKCE) Extension for Supported Authorization Flows checkbox.










 How to Create a Salesforce Form in WordPress [Step-by-Step!]