Add a custom WooCommerce form to your product pages. Create your WordPress form however you would like, add a calculation to generate the total, and select your form in the sidebar box on the WooCommerce page. The product price used in your WooCommerce cart comes from the last calculation field in your form.

Please note that the Formidable WooCommerce add-on does not yet support multi-page forms.
Download and install
- If you haven't already, install and activate the current version of Formidable Forms Premium on your WordPress site.
- After confirming your Formidable Forms license, proceed to the Formidable → Add-Ons page and toggle on the WooCommerce integration plugin.

Add a form to WooCommerce products
- Create a form. You'll need a calculation in your form to link up with the WooCommerce price. To accurately calculate the total amount in your WooCommerce forms, it is important to use the correct field types and settings.
- Use the Total field with Product options. When using the Total field type, make sure your item options are set as Product field types.

Using other field types might lead to incorrect total calculations. For example, if you are selling shirts, your product options could have size options with the price included.

- Use dropdown, radio, or checkbox options. If you prefer dropdown, radio, or checkbox field type as the item options, use a single text or number field type as your total field. Enable field calculations to ensure the total amount is calculated correctly. You would need to insert the field ID/keys of the dropdown, radio, or checkbox in the Default Value (Calculation) field to calculate the total amount. For example, your calculation could look like this:

- Use the Total field with Product options. When using the Total field type, make sure your item options are set as Product field types.
- Create a WooCommerce product. The product should set the base price of the product. On the edit product page, add the form using the Choose a Form select box in the sidebar. Now save your product.

If you want your form calculation to ignore WooCommerce's calculations, you can check the box that says Use the total in the form without adding the product price. This option will not work if you have disabled storing entries in your form. - If you want to add additional calculations (such as a flat fee) to WooCommerce's calculations, you can create additional fields in your form, and add them to your calculations field.

- Finally, your form will show when you view your product page, and adjust the prices of the items you add to your cart.

Set a default form
If you are creating a WooCommerce product and want to automatically assign a default Formidable form, follow the steps below.
- Add a hidden field to your form. In the Default Value box, insert the form ID to be connected to your WooCommerce Product.

- Go to your form Settings → Actions & Notifications page and select the Create Post action.
- In the Custom Fields section, click Add new to add a new custom field.

- Insert _attached_formidable_form as the Name. Select the hidden field with the form ID as the Value.

- Click the Update button to save your settings.
Collect user info in product without calculating price
There may be products where you want to get a user's information or other information related to the product without affecting the base product price. Since forms embedded in product pages require a calculation, follow these instructions to include a form in a product without affecting the price.
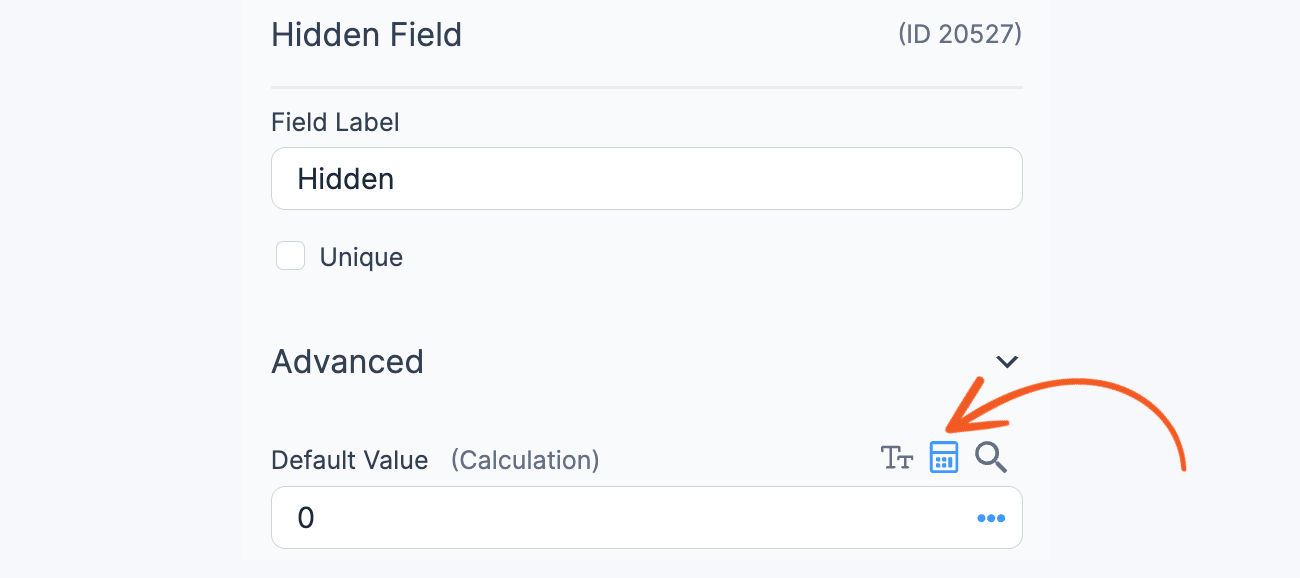
- In the form you wish to include with the product, add a hidden field and enable field calculations. Enter 0 (zero) in the Default Value (Calculation) box to ensure it doesn’t affect the product price.

- Save the changes to the form.
- Navigate to the WooCommerce Products and select the product page where you plan to embed the form. Look for the Choose form dropdown on the sidebar, then select the form you have configured.

Replace the registration form
WooCommerce includes a basic registration form. This can be fully customized and replaced with a Formidable form.
- Install the Formidable WordPress user registration plugin. This allows user accounts to be created and updated.
- Create a registration form if you haven't yet.
- Go to the Formidable → Global Settings → Registration settings page and scroll to the bottom.
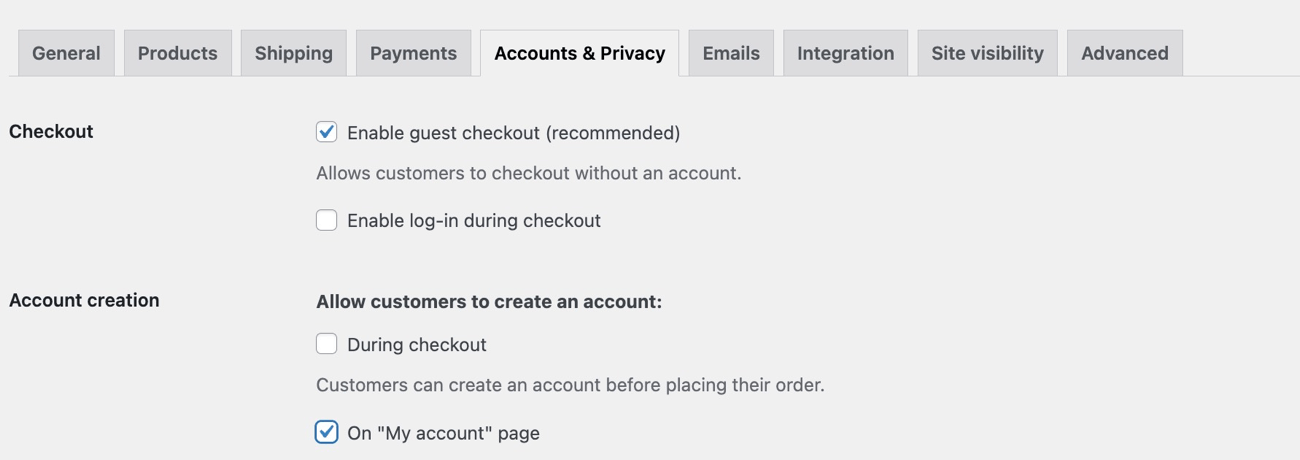
- If you haven't turned on registration in WooCommerce, click the link to Allow customers to create an account on the "My account" page. This will take you to the WooCommerce settings to turn this option on.
- Select the registration form you created from the Select Registration Form dropdown. This will automatically replace the WooCommerce login form that is included on the same page as the registration form.

Replace the profile form
The profile form is included in the My Account area in WooCommerce. This can also be replaced with a Formidable Form.
- Install the Formidable WordPress user registration plugin if you haven't yet.
- Create a profile form.
- Go to the Formidable → Global Settings → Registration settings page and scroll to the bottom.
- Select the profile form you created from the Select Profile Form dropdown. This will replace the form on the WooCommerce account page, under the Account Details tab.

Auto-populate WooCommerce billing address
If you register users on your site or allow them to update their profiles with the User Registration add-on, you can add User Meta to their user profile that will auto-populate the Billing Address fields on the WooCommerce checkout page. Here's how you can do that:
- Set up a form to register users or edit a profile with the User Registration add-on.
- Add separate fields in the form for all the WooCommerce checkout fields you need to populate. For reference, a list of these field names is provided below.
- Add user meta to the form following the pattern in the screenshot below:

- Make sure that your billing_country user meta field is mapped to a list that contains two-letter country codes, NOT the full country name.
Here's a list of WooCommerce checkout field names that you can map to:
- billing_first_name
- billing_last_name
- billing_address_1
- billing_address_2
- billing_city
- billing_state
- billing_country
- billing_postcode
- billing_company
- billing_phone
- account_first_name
- account_last_name
- account_email
Create WooCommerce Order from Form
Using the Create Post form action, you can set up a form to generate WooCommerce orders when submitted. With this guide, you can create a WooCommerce order, but it will not add that order to the cart. Follow the instructions below to get started.
- Create a form and add a Create Post form action to it. Set the Post type to Orders.
- Set the Post Title to any field in your form and leave Post Content blank. Map the Excerpt to a Paragraph Text field which will be the user-provided notes in the order.
- Go to the Custom Fields section of the form action. Add custom fields for each Order custom field that you want to fill. A list of Order custom field names is found below.
- Make sure that the custom fields for _order_total and _customer_user are mapped to the correct values.
- Save the form. When the form is submitted, an order is created on the WooCommerce → Orders page.
Below is a list of Custom Field names you can map to, along with the expected data type:
| Name | Data type |
|---|---|
| _order_total | Number |
| _customer_user | User ID |
| _payment_method | "cod", "paypal", "stripe", "other" |
| _billing_first_name | Text |
| _billing_last_name | Text |
| _billing_address_1 | Text |
| _billing_address_2 | Text |
| _billing_city | Text |
| _billing_state | Two-letter State code |
| _billing_country | Two-letter Country code |
| _billing_postcode | Number |
| _billing_company | Text |
| _billing_phone | Number |
| _billing_email | |
| _shipping_first_name | Text |
| _shipping_last_name | Text |
| _shipping_address_1 | Text |
| _shipping_address_2 | Text |
| _shipping_city | Text |
| _shipping_state | Two-letter State code |
| _shipping_country | Two-letter Country code |
| _shipping_postcode | Number |
| _shipping_company | Text |
Add Order Status field
By default, an entry is created whether or not the Woocommerce order is completed. You can add an Order Status field in your form to show completed orders.
- Add a hidden field in your form and label it Order Status.

- Set the default value to Pending.

- Use this code example to update the Order Status field value to Complete when the order is completed.
- If you want to get notified when the order status has been updated, set up your email notifications to trigger when the Entry is updated.

- Add conditional logic to trigger if Order Status is equal to Complete.

Trigger actions after WooCommerce event
Several actions can be triggered after a WooCommerce event.

- WooCommerce order completed: This event type is only triggered when the order is marked as complete, not on payment.
- WooCommerce payment: This event type is triggered when the order is marked as complete with successful payment.
- WooCommerce pending order: This event type is triggered when the order is marked with pending order status.
Related customizations
Add order ID to entry
Use the following code to add the Woocommerce order ID to a field in a Formidable form after the order is placed in Woocommerce. You will need to add a hidden field to your form. After a checkout is completed, the order ID will be added to the hidden field. Replace 25 with the ID of your form and replace 123 with the ID of the hidden field.
add_action( 'woocommerce_new_order_item', 'add_order_id_to_entry', 10, 3 );

function add_order_id_to_entry( $item_id, $cart_item, $order_id ) {

// check if there's form data to process

if ( empty( $cart_item->legacy_values['_formidable_form_data'] ) ) {

return;

}

// get form entry

$entry = FrmEntry::getOne( $cart_item->legacy_values['_formidable_form_data'] );

if ( $entry && $entry->form_id == 25 ) {

$field_id = 123;

$added = FrmEntryMeta::add_entry_meta( $entry->id, $field_id, null, $order_id );

if ( ! $added ) {

FrmEntryMeta::update_entry_meta( $entry->id, $field_id, null, $order_id );

}

}

}
Dynamically add order ID and entry meta to order
An extension of the 'Add Order ID to Entry' customization
add_action( 'woocommerce_new_order_item', 'save_entry_data_with_order', 10, 3 );
function save_entry_data_with_order( $item_id, $cart_item, $order_id ) {

// check if there's form data to process
if ( empty( $cart_item->legacy_values['_formidable_form_data'] ) ) {
return;
}

// get form entry
$entry = FrmEntry::getOne( $cart_item->legacy_values['_formidable_form_data'] );
if ( $entry ) {
global $wpdb;
// Order ID Field - Change 'woo order id' text to name of order id field in your form
$field_id = $wpdb->get_var ( $wpdb->prepare( "SELECT id FROM {$wpdb->prefix}frm_fields where name = 'woo order id' and form_id = %d ", $entry->form_id) );
$added = FrmEntryMeta::add_entry_meta( $entry->id, $field_id, null, $order_id );
if ( ! $added ) {
FrmEntryMeta::update_entry_meta( $entry->id, $field_id, null, $order_id );
}

// code below here is to save any custom fields to the WooCommerce Order Meta table to allow for easier use when combining with orders
// note that you can comment out any or all below if you do not want to save entry data with the order meta
// you will need to change the Name of the field in each query to the name of your field you want saved to the order
// be sure to change '_custom_key' text to whatever you would like your keyname to be in the order meta

$field_id = $wpdb->get_var ( $wpdb->prepare( "SELECT id FROM {$wpdb->prefix}frm_fields where name = 'Additional Person Name' and form_id = %d ", $entry->form_id) );
$meta_value = FrmEntryMeta::get_meta_value( $entry, $field_id );
if($meta_value === NULL) {$meta_value='';}
update_metadata( 'post', $order_id, '_custom_key_1', $meta_value );

// Additional Person Email Field
$field_id = $wpdb->get_var ( $wpdb->prepare( "SELECT id FROM {$wpdb->prefix}frm_fields where name = 'Additional Person Email' and form_id = %d ", $entry->form_id) );
$meta_value = FrmEntryMeta::get_meta_value( $entry, $field_id );
if($meta_value === NULL) {$meta_value='';}
update_metadata( 'post', $order_id, '_custom_key_2', $meta_value );

// Additional Person Phone Number Field
$field_id = $wpdb->get_var ( $wpdb->prepare( "SELECT id FROM {$wpdb->prefix}frm_fields where name = 'Additional Person Phone Number' and form_id = %d ", $entry->form_id) );
$meta_value = FrmEntryMeta::get_meta_value( $entry, $field_id );
if($meta_value === NULL) {$meta_value='';}
update_metadata( 'post', $order_id, '_custom_key_3', $meta_value );

// Total Field
$field_id = $wpdb->get_var ( $wpdb->prepare( "SELECT id FROM {$wpdb->prefix}frm_fields where name = 'Total' and form_id = %d ", $entry->form_id) );
$meta_value = FrmEntryMeta::get_meta_value( $entry, $field_id );
if($meta_value === NULL) {$meta_value='';}
update_metadata( 'post', $order_id, '_custom_key_4', $meta_value );
}
}
Change field value after completed order
Use the following code to change a field value after a Woocommerce order is completed. Replace 25 with the ID of the form to update, replace 100 with the field ID to update, and replace 'Complete' with the new value you would like to use. Please note: You must have a default value submitted in the field in order for this function to work.
add_action( 'woocommerce_order_status_completed', 'update_frm_entry_after_wc_order_completed' );

function update_frm_entry_after_wc_order_completed( $order_id ) {

$order = new WC_Order( $order_id );

$items = $order->get_items();

foreach ( $items as $item_id => $product ) {

if ( isset( $product['formidable_form_data'] ) && is_numeric( $product['formidable_form_data'] ) ) {

$entry_id = $product['formidable_form_data'];

$entry = FrmEntry::getOne( $entry_id );

if ( $entry && $entry->form_id == 25 ) {

$field_id = 100;//Replace 100 with the field ID to update

$new_value = 'Complete';

FrmEntryMeta::update_entry_meta( $entry_id, $field_id, null, $new_value );

}

}

}

}
Add username to field after completed order
This code example is similar to the above, but will add a username to a field in the entry after the order is completed. Replace 576 with the form ID and 13686 with the field ID.
add_action( 'woocommerce_order_status_completed', 'update_frm_entry_after_wc_order_completed' );

function update_frm_entry_after_wc_order_completed( $order_id ) {

$order = new WC_Order( $order_id );

$items = $order->get_items();

foreach ( $items as $item_id => $product ) {

if ( isset( $product['formidable_form_data'] ) && is_numeric( $product['formidable_form_data'] ) ) {

$entry_id = $product['formidable_form_data'];

$entry = FrmEntry::getOne( $entry_id );

if ( $entry && $entry->form_id == 576 ) { // Replace 576 with the form ID

$field_id = 13686; //Replace 13686 with the field ID to update

$user_id = $entry->user_id;

$user = get_user_by("id", $user_id);

$new_value = $user->user_login;

FrmEntryMeta::add_entry_meta( $entry_id, $field_id, null, $new_value );

}

}

}

}
Show WooCommerce variations
WooCommerce includes the normal variation labels as part of the name in the cart. If your product uses both WooCommerce variations and a Formidable form, include this line to show the WooCommerce variations in the cart.
add_filter( 'woocommerce_product_variation_title_include_attributes', '__return_false' );
Use a form field to update WooCommerce quantity
WooCommerce will accept input from your form as part of its cost calculation, though quantity is specified by a WooCommerce field. If you would like a form field to update the quantity as well, you can use this JavaScript.
<script>
jQuery(document).ready(function($){
    jQuery('#field_iw7oc').change(function(){
        var fpField = $("#field_iw7oc").val();
        var wooField = jQuery(".input-text.qty.text");
        if(fpField == ''){
            wooField.val("1");
        } else {
            wooField.val(fpField);
        }
    });
});
</script>
Change 'iw7oc' to your quantity field's key. This snippet can be placed in your form's "Settings" > "Customize HTML" > "After Fields" box.
Modify field types in order
To add specific field types to the Woocommerce order and cart see the example to modify field types in order.
Include or exclude fields in cart
To determine if a field should show in the Woocommerce cart, use the example to include or exclude fields in cart.
Re-order fields in cart
See the example to re-order fields in cart
Adjust values displayed in cart
See the wc_fp_cart_item_data hook for examples.
Display SKU
Use the [sku] shortcode to display a product's SKU on the product's page. If you have a form on a product's page, you can set the default value of a field to [sku] to save the product's SKU in the field.
function get_sku( $atts ){
	return get_post_meta( get_the_ID(), '_sku', true );
}
add_shortcode( 'sku', 'get_sku' );
Get product price
Use the [price] shortcode to get the product's price when on the product's page. If you have a form on a product's page, you can set the default value of a field to [price] to save the product's price in the field. This can be used to calculate a total in the Formidable form based on the product's price.
function ff_get_price( $atts ){
  $post_id = get_the_id();
  $product = wc_get_product( $post_id );

  if ( ! isset( $product ) ){
	return '';
  }

  return $product->get_price();
}

add_shortcode( 'price', 'ff_get_price' );
Add gallery to WooCommerce product
When creating a product with Create Post action, mapping the file upload field to _product_image_gallery under Post meta does not create the product gallery. To add a gallery to the product, use the frm_after_create_entry hook.


 How To Create a Custom WooCommerce Order Form [4 Easy Steps]
 The Best WooCommerce Themes for WordPress (Free & Paid)
 How To Start an Online Store with WordPress [Step-By-Step]
 20 Best WooCommerce Plugins For Your Online Store [Free & Paid!]
 How to Use the Best WooCommerce Profile Builder Plugin
 How to Add WordPress Product Options in an Order Form
 How To Build a Custom WooCommerce Registration Form
 The Ultimate WooCommerce Form Builder