Subscribe your users to an AWeber mailing list when they submit your forms. Please note, you must have an AWeber account in order to use the AWeber add-on.
Download and Install
- If you haven't already, install and activate the current version of Formidable Forms Premium on your WordPress site.
- After confirming your Formidable Forms license, proceed to the Formidable → Add-Ons page and toggle on the AWeber WordPress plugin.

- Now that the plugin is activated, go to Formidable → Global Settings → AWeber. Insert your Authorization ID. You can create an Authorization ID by clicking the link on the AWeber settings page or click here to type in your AWeber login information and get an Authorization ID.

- Now you can copy and paste the authorization code from AWeber's site into the Authorization ID field.

Set up AWeber in a Form
- To get started, go into edit the form which you will be using to subscribe users to a mailing list. Click Settings → Actions & Notifications.
- Click the AWeber logo.
- Select the AWeber mailing list that you would like to add subscribers to, then select the name and email fields from your form. If you have a first and last name field in your form instead of a full name field, you can use text calculations to combine the first and last name into a hidden field. Then you can map this hidden field to the AWeber Full Name field.

- You can also define a custom field for your action if you want to include fields other than Full Name and Email. Go to Aweber → List Options → Custom Fields and create custom fields that you would like to add.
- You can also define an ad tracking category for your action and include any comma separated tags that you want. Both of these fields support shortcodes as well. Any previously used tags will be listed as well for easy reuse.
- If you have an Opt-in question in your form, you can use conditional logic only to add users who intentionally opt-in. Please note that Conditional Logic is only available in the Pro version of Formidable Forms.

You can use multiple rows of conditional logic for one list. You can also choose ALL or ANY conditions that must be met to add the user to the mailing list. - Don’t forget to hit Update so these settings will be saved.
- If you wish to have multiple lists for one form, simply repeat steps 1-6 as needed.

Troubleshooting
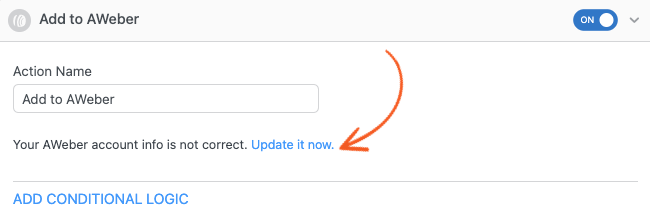
AWeber account info is not correct
If your account info is incorrect, you may receive this error message. This may occur if your AWeber authorization ID was not set up correctly, or if your action had already been connected to another account.

Please make sure you have downloaded and installed the AWeber add-on properly. If you have any questions or issues, please feel free to open a ticket.
Logging
If you have followed the instructions above and data isn't getting added to Aweber, the first step is to install the Formidable Logs add-on. It will give you more details about any errors that might be preventing your data from getting to Aweber.


 How to Add Email Subscription Forms in WordPress
 How to Install an AWeber Opt-in Form in WordPress