Choose what the user sees after an entry is submitted. Select one of the following:
- Show the success message
- Redirect to a different site, different page, or using separate values
- Show content from another page
- Set redirect delay and show a message
- Conditionally redirect based on selection

Show message
After an entry is submitted, a success message will appear. You can add any values from the submitted entry to your confirmation message, including conditional statements. To edit the success message, follow the steps below:
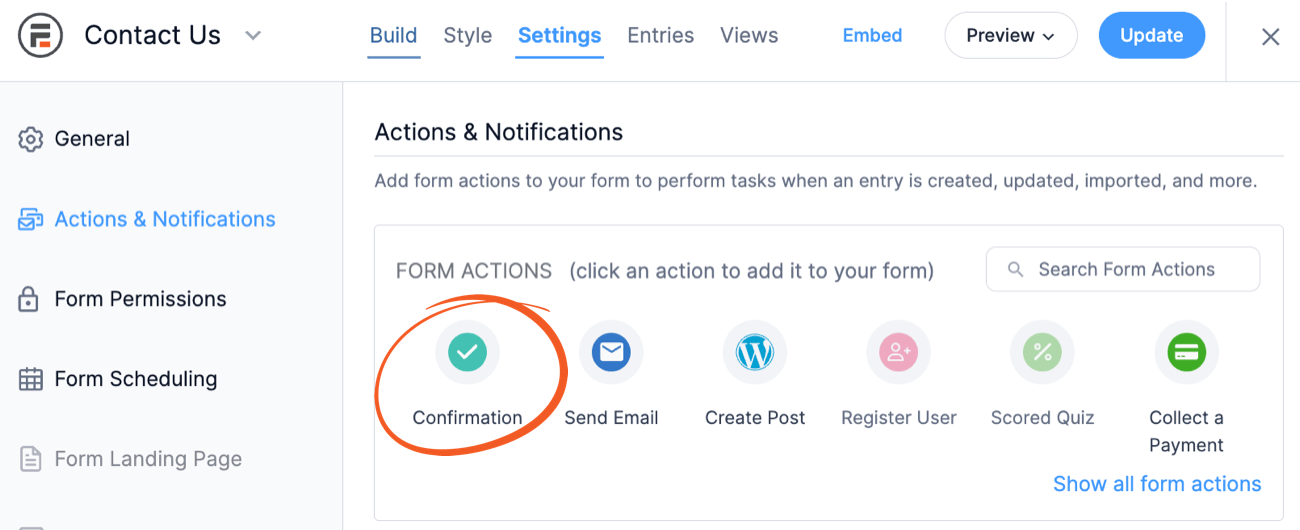
- Go into your form. Click on Settings → Actions & Notifications. By default, there will already be a Confirmation action set up. Click on the Confirmation action to edit it, or click the Confirmation icon to add a notification.

- Enter an Action Name for easy reference. This action name will only be seen on the back end.
- To configure when the Confirmation action is triggered, select one or more of the following from the Trigger this action when options: Entry is created, and Entry is Updated. If you are running the Lite version, these options are hidden and the form action will be triggered when an entry is created.
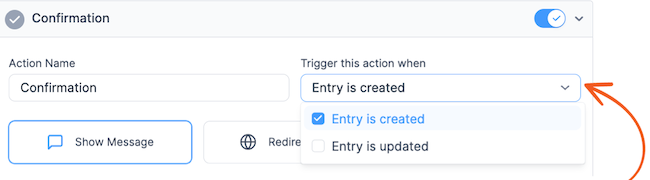
- Select the Show Message button. Use the Rich text editor to customize the success message.
- To include the blank form below your confirmation message, toggle the option to Show the form with the confirmation message. This is helpful if users are submitting the form multiple times.


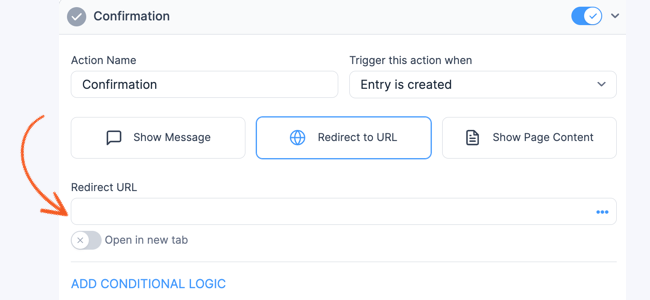
Redirect to URL
Send users to another page or site after form submission by following the instructions below.
- Go into your form. Click on Settings → Actions & Notifications. By default, there will already be a Confirmation action set up. Click on the Confirmation action to edit it, or click the Confirmation icon to add a notification.
- Enter an Action Name for easy reference. This action name will only be seen on the back end.
- To configure when the Confirmation action is triggered, select one or more of the following from the Trigger this action when options: Entry is created, and Entry is Updated. If you are running the Lite version, these options are hidden and the form action will be triggered when an entry is created.
- Select the Redirect to URL button.
- In the Redirect URL box, enter the URL where you want users to be redirected.
- To open the redirect URL in a new tab in the browser, toggle the option Open in new tab.


Redirect to page on same site
To redirect users to a specific page on your site, enter the URL for the page where you want to users to be redirected in the Redirect URL box. You can use the [siteurl] shortcode to insert the URL of your site from the WordPress Settings → General page. Your URL might look like this: [siteurl]/page-1/

Redirect to different site
To redirect users to a different site or a specific URL, enter the URL for the page where you want to users to be redirected in the Redirect URL box. Your URL might look like this: https://example.com/landing-page/

Redirect using separate values
If you are working with long redirects on the same site, a simpler way of handling this is by using separate values. Note: This option will only work if your field options match exactly with your page slug. Follow the steps below to get started.
- In the Redirect URL box, enter the URL for the page where you want to users to be redirected. You can use the [siteurl] shortcode to insert the URL of your site from the WordPress Settings → General page. Your URL might look like this: [siteurl]/[1222 show=value]. Replace 1222 with your form field.
- In your form builder, add the options for your dropdown or radio field.
- Enable separate values and change the saved value for each option to the page slug that you want it to be redirected. For example, your setup could look like this:
Option Label Saved Value Baby Clothing baby-clothing Baby Accessories baby-accessories Baby Food baby-food - Once you're done, click the Update button in your form builder to save your changes.
- Now when a user selects Baby Clothing in the submitted form, they will get redirected to https://mysite.com/baby-clothing/. If a user selects Baby Accessories, they will get redirected to https://mysite.com/baby-accessories/. If a user selects Baby Food, they will get redirected to https://mysite.com/baby-food.


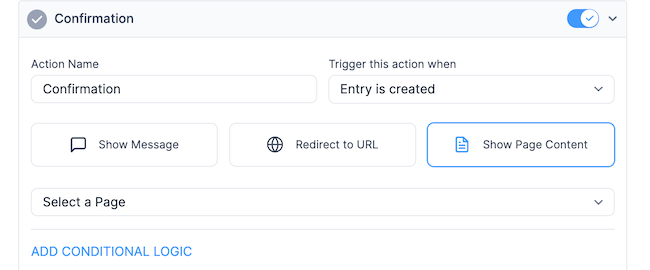
Show page content
Present a message from another page when an entry is submitted. It is a good option if you have a page you want to protect by requiring a form to be submitted before viewing. You can mark the page as Private, making it inaccessible to users, but the content from that page can still be used in the success message. To get started, follow the instructions below.
- If you haven't yet, follow steps 1-3 here.
- Select the Show Page Content button.
- Select the page where you would like users to view the content from.
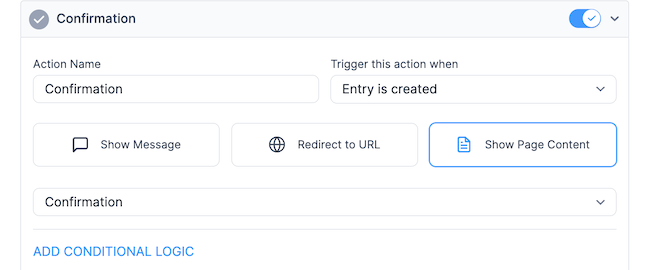
Form confirmation page
To create a form confirmation page that contains the submitted values of the form, follow the steps below.
- Follow steps 1-4 here to piece together the message that you would like to show on the confirmation page.
- Click the three dots at the bottom right side of the message box to display the form's field IDs which you can use in the confirmation message. You can also add HTML and inline CSS to this message box to style your message.
- Copy this message and paste it into the HTML text box of a WordPress page and click Publish. This will be your confirmation page.
- Return to your Confirmation form action settings and change the action from Show Message to Show Page Content. In the Select a Page dropdown, select the confirmation page you created and click the Update button.
- After submitting an entry to the form, the content from the published confirmation page is shown to the user.


Set redirect delay and show message
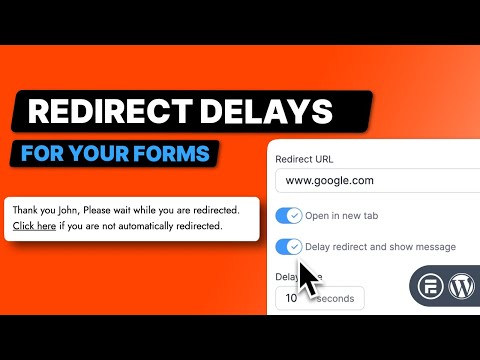
When you redirect users from a form to another page, you can add a short delay and show a message to improve their experience and keep them informed while they wait. The following guide will walk you through setting up a redirect delay with a custom message.
- Navigate to the confirmation action settings and enable URL redirection by clicking the Redirect to URL button.
- In the Redirect URL box, enter the destination URL by typing the web address where you want users to be sent.
- Toggle the Delay redirect and show message option to turn on the Redirect delay.
- Enter the delay time in seconds. The default time is 8 seconds.
- Customize the redirect message by typing the message you want users to see during the delay. By default, the message is Please wait while you are redirected.

Conditional redirect
Confirmation form action supports conditional logic to redirect users to different pages or URLs, depending on the information they select and submit within the form. To set this up, follow the steps below.
- Any: Requires only one of the rules to match.
- All: Requires that all rules match before the logic is triggered.
Conditional redirect to a page on your site
You may want to redirect users to different pages on your site if they have chosen a specific option in a form field. For example, you might have a form where users can select the topic that they are interested in and they will be redirected to a specific page on your site after form submission.
- If you haven't yet, follow steps 1-4 here.
- In the Redirect URL box, enter the URL where you want to users to be redirected. Your URL might look like this: http://mysite.com/baby-clothing/.
- Click the Add Conditional Logic link and add the criteria that you want: Do this action if any of the following match: Select the topic IS EQUAL to Baby Clothing.
- Create another Confirmation form action and select the Redirect to URL button.
- In the Redirect URL box, enter the URL where you want to users to be redirected. Your URL might look like this: http://mysite.com/baby-accessories/.
- Click the Add Conditional Logic link and add the criteria that you want: Do this action if any of the following match: Select the topic IS EQUAL to Baby Accessories.
- Repeat the steps above depending on how many redirects you want to set up.
- Once you're done, click the Update button to save your changes.
- Now when a user selects Baby Clothing in the submitted form, they will get redirected to http://mysite.com/baby-clothing/. The same thing goes for when a user selects Baby Accessories in the submitted form, they will get redirected to http://mysite.com/baby-accessories/.


Conditional redirect to a different site
You may want to redirect users to a different site if they have chosen a specific option in a form field. For example, you might have a form where users can select the topic that they are interested in and they will be redirected to a different URL after form submission.
- If you haven't yet, follow steps 1-4 here.
- In the Redirect URL box, enter the URL where you want to users to be redirected. Your URL might look like this: http://babyclothing.com/landing-page/.
- Click the Add Conditional Logic link and add the criteria that you want: Do this action if any of the following match: Select the topic IS EQUAL to Baby Clothing.
- Create another Confirmation form action and select the Redirect to URL button.
- In the Redirect URL box, enter the URL where you want to users to be redirected. Your URL might look like this: http://babyaccessories.com/landing-page/
- Click the Add Conditional Logic link and add the criteria that you want: Do this action if any of the following match: Select the topic IS EQUAL to Baby Accessories.
- Repeat the steps above depending on how many redirects you want to set up.
- Once you're done, click the Update button to save your changes.
- Now when a user selects Baby Clothing in the submitted form, they will get redirected to http://babyclothing.com/landing-page/. The same thing goes for when a user selects Baby Accessories in the submitted form, they will get redirected to http://babyaccessories.com/landing-page/.


Common questions
What will happen if I don't create a form action?
If you have not created a Confirmation form action, the default message from the Formidable → Global settings will be displayed. If you have created at least one Confirmation form action, it will work as the current version.
Can I create multiple form actions?
You can create multiple Confirmation actions for your form.
- If you have both Show message and Show page content actions, both actions get triggered and it will show both of them.
- If you have multiple Redirect to URL actions, it will redirect to the first action's URL instantly. To specify when the Redirect to URL actions is triggerd, use conditional redirects.
- If you have both Redirect to URL and Show message, Redirect to URL and Show page content, or all of them, all these actions will get triggered and show all messages and page contents for 8 seconds, then redirect to the first matched action's URL.
Related developer hooks
- Manipulate a form's success message with the frm_success_filter hook.
- Prevent redirect action when updating an entry with the frm_success_filter hook.
- Filter the Confirmation actions that meet the conditional logic with the frm_get_met_on_submit_actions hook.
- Filter the run success action args with the frm_get_run_success_action_args hook.
- Filter the delay time before redirecting with the frm_redirect_delay_time hook.
- Increase the confirmation form action limit with the frm_on_submit_action_options hook.
- Remove the success message with the frm_main_feedback hook.
- Use a custom class with the successs message with the frm_main_feedback hook.
 How To Display a Success Message in WordPress [3 Steps!]