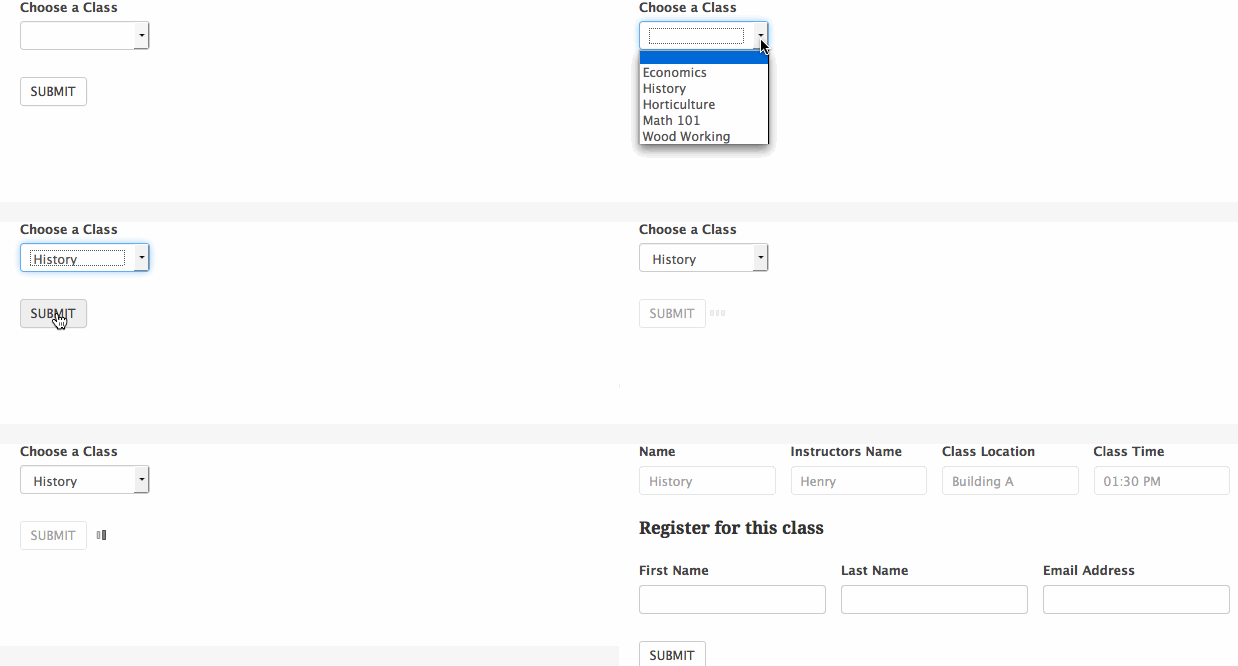
Use Dynamic fields to create dropdowns, checkboxes, and radio buttons that are dynamically populated with submitted entries or with categories/taxonomies. Dynamic fields can link entries together and allow users to make selections from data entered in other Formidable forms. Values submitted in Dynamic fields stay linked to the original entry, so that if selections in the original entry are updated, so too are the values in the Dynamic field.

Lookup fields can also be dynamically populated with submitted entries. If you want to learn about the differences between a Dynamic field and a Lookup field, please click here.
Standard field options
A Dynamic field has the following standard options.


- Field type
- Required
- Unique
- Read Only
- Field key
- CSS layout classes
- Label position
- Field size
- Visibility
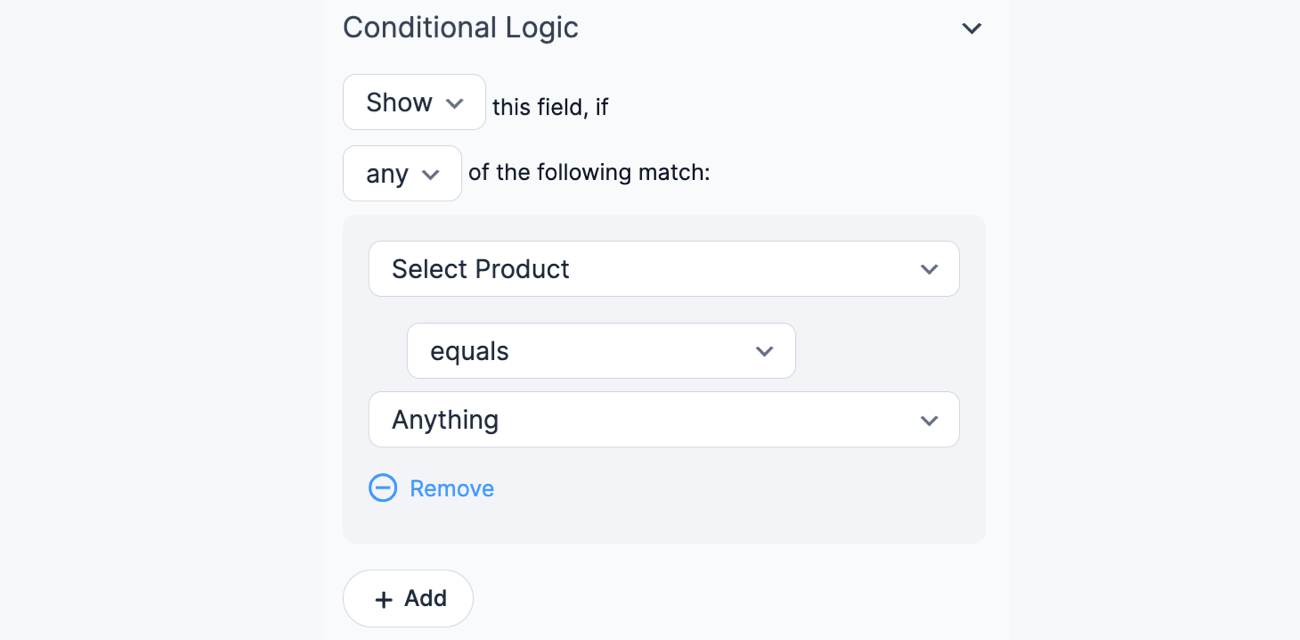
- Conditional logic
- Dynamic default value
Field-specific options
Load options from
If you would like to load options into your Dynamic field from entries submitted in another Formidable form, you can choose Form Entries in the Load Options From dropdown. You will then be asked to choose the form you want to load from, and the specific field in that form you would like to load options from.

If you would like to populate a Dynamic field with post categories, see how to add hierarchical categories.

Display type
After you have chosen which options to load in your Dynamic field, you can choose to display those options in a dropdown menu, a set of radio buttons, a set of checkboxes, or a list.
The List option in Dynamic fields will display a value when it has conditional logic dependent on a Dynamic dropdown, radio, or checkbox field. It will not store a value, so this field type is not available in View or email options.
Dynamic List fields are designed to use conditional logic based on a parent Dynamic field. It should be set to use the same form that the parent field uses. For example, if I have a form with a name field used in a dynamic dropdown, and an email field used in a Dynamic List field, when the name is selected, the email address will show. This example can be seen below.
Limit entries
When you load entries from a form, you can limit the selection of those entries to ones created by the current user who is filling out the form. To do so, simply check the box in your field options as seen below.
Option order
Select the Option order that you would like. You can display options in ascending order (A-Z), descending order (Z-A), or set no order.
Set up cascading fields
You may use Dynamic fields to set up cascading fields. This works well for a country/state/city scenario where the available options are filtered by the value selected in a previous field. Lookup fields also provide this option and there are benefits to using Lookup fields in many situations. Review the differences between Lookups and Dynamic fields to determine which is best for your setup. The biggest differences between the two field types is that Dynamic fields require a separate form for each cascading field and they store the entry ID, where as Lookup fields do not. Follow the steps below to set up a cascading country/state/city setup.
- Create a new form titled 'Country'. Add a Single Line Text or Dropdown field. Title it 'Country'. Submit an entry for each country option that you want to have available or import the countries.
- Create a new form titled 'State'. Add a Dynamic > Dropdown field. Set it up to get its options from the Country form > Country field. Add a Single Line Text or Dropdown field. Title it 'State'. Submit an entry for each country and state combination that you want to have available, or import the countries and states.
- Create a new form titled 'City'. Add a Dynamic > Dropdown field. Set it up to get its options from the Country form > Country field. Add a second Dynamic > Dropdown field. Set it up to get its options from the State form > State field. Add conditional logic on the second Dynamic Dropdown so it shows only when the Country dropdown is 'equal to anything'. Add a Single Line Text or Dropdown field. Title it 'City'. Submit an entry for each country, state, and city combination that you want to have available, or import the countries, states, and cities.
- Go into the form that your end user will interact with, or create a new form. Add a Dynamic > Dropdown field. Set it up to get its options from the Country form > Country field. Add a second Dynamic > Dropdown field. Set it up to get its options from the State form > State field. Add conditional logic on the second Dynamic Dropdown so it shows only when the first is 'equal to anything'. Add a third Dynamic > Dropdown field. Set it up to get its options from the City form > City field. Add conditional logic on the second Dynamic Dropdown so it shows only when the Country and State dropdowns are 'equal to anything'.
Populate fields with values from selected entry
If you would like to automatically populate fields with a Dynamic field based on a selected entry, you can follow the directions below. If you would prefer to automatically populate fields based on a selected entry with a lookup field, click here.
- Publish the form that you want to autofill on a page. Copy the URL of this page.
- Create a new form called 'Select entry'. This form is where the user will make their entry selection.
- Add a 'Dynamic field' → 'Dropdown'
- Set it to 'Load options from: Form Entries, -the form you want to pull values from-, any field'

- Go into the 'Select entry' form's Settings. Select 'Redirect to URL' and insert the URL copied from Step 1. Add ?pass_entry=[x show=key] to the end of the URL. Replace x with the ID of the Dynamic field.

- Go into the form that you want to autofill. Put [frm-field-value field_id=x entry=pass_entry] in the Default Values box in the field options.

Replace x with the Key or ID of the field that you want to pull the value from. - Now when the user submits the 'Select entry' form, it will populate fields with values from the selected entry.

Dynamically display values from selected entry
If you would like to dynamically display values when an option is selected in a Dynamic field, follow the instructions below.
- Create a new form or go into edit an existing form.
- Add a Dynamic > Dropdown field. This will be the field where users will select a value from a submitted entry. Set it up to load options from 'Form Entries'. In the next dropdown that appears, select another form on your site, then select any field in that form.

Set up this field to display as a dropdown, radio button, or checkbox. - Add Dynamic > List field. This will be used to display information from the entry selected in the previous Dynamic field. Set it up to load options from 'Form Entries'. In the next dropdown, select the same form that you selected in the previous Dynamic field's options. Select any field from that form.

Add conditional logic that says 'Show this field if any of the following match: First Dynamic field is equal to anything".

- Try it out! Publish your form on a page. When you select an entry from the first Dynamic field, a value from the selected entry will appear in the Dynamic List field.

Display Dynamic field values
You can use the following shortcodes to display a variety of information from a Dynamic field in a form's confirmation message, email notification, or View.
- Value from linked entry: Display a field value from the linked entry.
[x show="y"]
Replace x with the ID of your Dynamic field and replace y with the ID of any field in the linked form.
- Creation date: Display the creation date of the linked entry.
[x show="created-at"]
Replace x with the ID of your Dynamic field
- Entry ID: Display the ID of the linked entry.
[x show="id"]
Replace x with the ID of your Dynamic field
- User ID information: Show information from the profile of the user who submitted the linked entry. You may use all of User ID shortcode options here.
[x show="user_email"]
Replace x with the ID of your Dynamic field.
- Three level entry information: If you have a Dynamic field that pulls from another Dynamic field, you can display information from the form that the second Dynamic field pulls from. You can use any of the above options to display information from the third level form.
[x show="y" show_info="z"]
Replace x with the ID of your Dynamic field, replace y with the ID of the second Dynamic field, and replace z with the ID of third Dynamic field. You may also replace z with "created_at", "id", "user_email", etc.
- Option Label: Display the label of the separated dynamic list field option.
[x show="label"]
Replace x with the ID of your Dynamic field.
Additional Customizations
Dynamic draft entries
As of version 5.4, dynamic fields will no longer include data from draft entries. You can use the frm_dynamic_field_include_drafts hook to include both drafts and non draft entries or draft entries only.
Related developer hooks
- Sort your Dynamic field options by the order the entries were added with the frm_data_sort hook.
- Remove duplicate values with the frm_data_sort hook.
- Only include categories with no parent with the frm_get_categories hook.
- Change the order of options set to list categories/taxonomies with the frm_get_categories hook.
- Dynamically select the option created by the current user with the frm_get_default_value hook.
- Search linked field for numeric values with the frm_search_for_dynamic_text hook.
- Filter the options with the frm_setup_new_fields_vars hook.
- Show admin all options in a filtered dynamic field with the frm_setup_new_fields_vars hook.
- Display two fields with the frm_setup_new_fields_vars hook.
- Change the blank option label with the frm_setup_new_fields_vars hook.
- Remove all used options with the frm_setup_new_fields_vars hook.
- Remove option used variable times with the frm_setup_new_fields_vars hook.
- Customize the HTML displayed in a Dynamic List field with the frm_show_it hook.
- Show full image instead of thumbnail in a Dynamic List field with the frm_show_it hook.
- Show option label with the frm_show_it hook.
- Get the text value from a Dynamic field and copy it over to a second field with the frm_validate_field_entry hook.
- Filter by User ID with the frm_where_filter hook.


