Allow users to create posts, pages, and custom posts types from the front-end of your site. Users may also manage and edit their posts through the Formidable form that was used to create the post. Add fields for the post title, content, categories, post status, custom fields, and several other items.
When posts are created using a Create Post form action the entry and the post are kept in sync. If the entry is updated, the post will be updated, and vice versa.

Create a WordPress post
- Go into your form. Click on Settings → Actions & Notifications and click the Create Post icon.

- Give your post an Action name for easy reference. This will only be seen on the back-end of your site.

- Pick which Post Type you would like to create: Posts, Pages, or Webhooks. If you have any custom post types set up on your site, they will appear in this dropdown as well.
- Select a field for your Post Title from the dropdown menu. Fields from your form will appear as options in this dropdown.
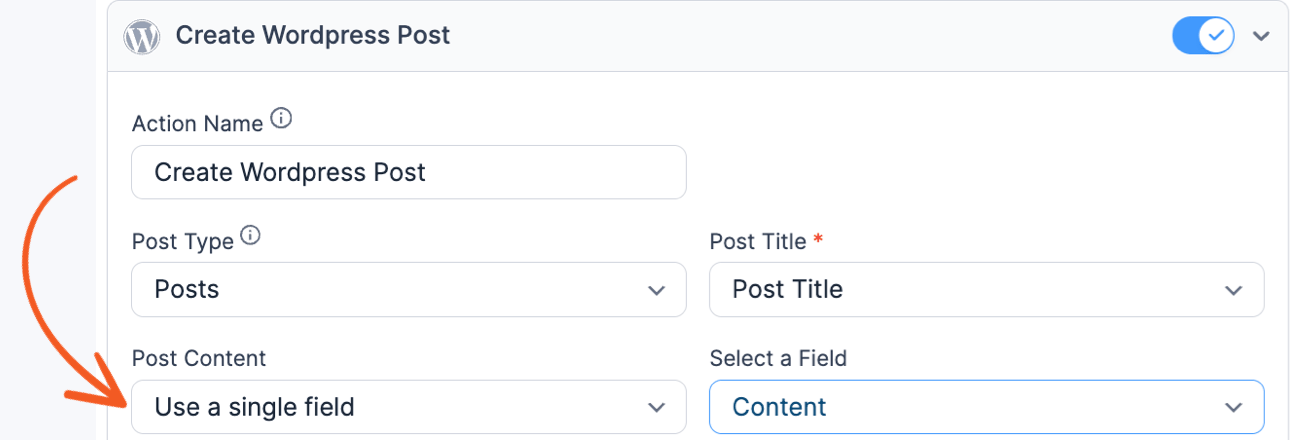
- Create your Post Content by selecting Use a Single Field or Customize post content. If you choose Use a Single Field, you can select a single field for the content of the post.

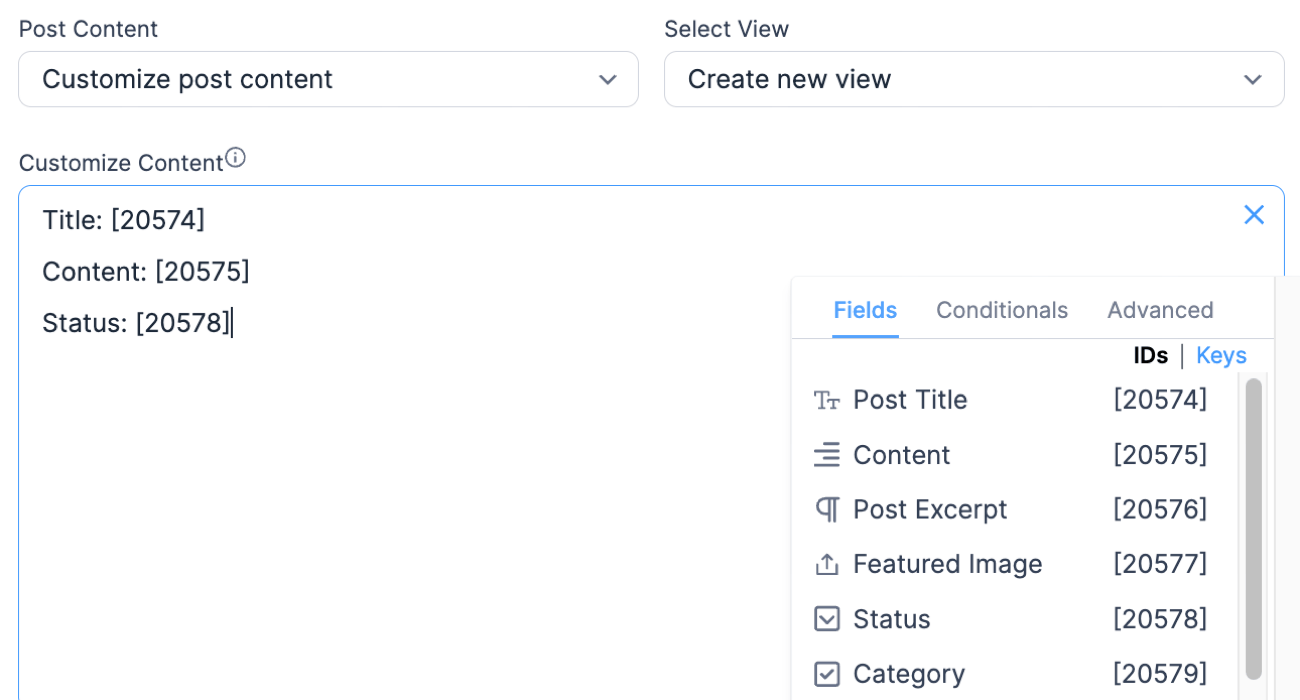
If you choose Customize post content, click on Create a new view and the Customize Content box will appear. By selecting this option, the content entered in the Customize Content box will become the content for your created post. Note: Using the Customize post content option requires the Formidable Views plugin.

- If you would like to set a post excerpt, select a field for the Excerpt option.

- If you would like to password-protect your post, create a field that will be used to set the password for the post. Then select the field with the password for the Post Password.
- Choose how the post Slug will be generated. By default, Automatically Generate from Post Title will be selected.
- Every created post has a Post Date. Most of the time, Date of entry submission should be selected; however, if you have a date field in your form and you want to set a post date in the past or the future, you can select that instead.
- Set the Post Status. You can choose create draft, pending, automatically publish, or create a new dropdown field. If you select the Create new dropdown field option, this allows the user to set the status of their post. Note: If the user does not have permission to create posts, then the Published option will not appear in the created dropdown.
- Set the Discussion settings. You can choose from allowing or disabling comments for all future posts created using the form action.
- Under Taxonomies/Categories, select the fields from the form that you would like to populate with your post categories or other taxonomies.

- Under Custom Fields, you can add post meta-data and add a featured image for your post. Not every custom field used throughout your site is included in the drop down options. If you need to select a custom field that isn't listed, click "Enter new" and type in the exact name of your custom field. If you would like to increase the number of existing custom fields that appear in this dropdown, custom code can be used.

Custom post types
In addition to creating standard posts, Formidable Pro can be used to create posts from custom post types on the front-end of your site. The Types - Complete Solution for Custom Fields and Types and the Custom Post Type UI plugins work well for creating custom post types.
When you add a custom post type, it will show up in your form's Create Post → Post Type dropdown.
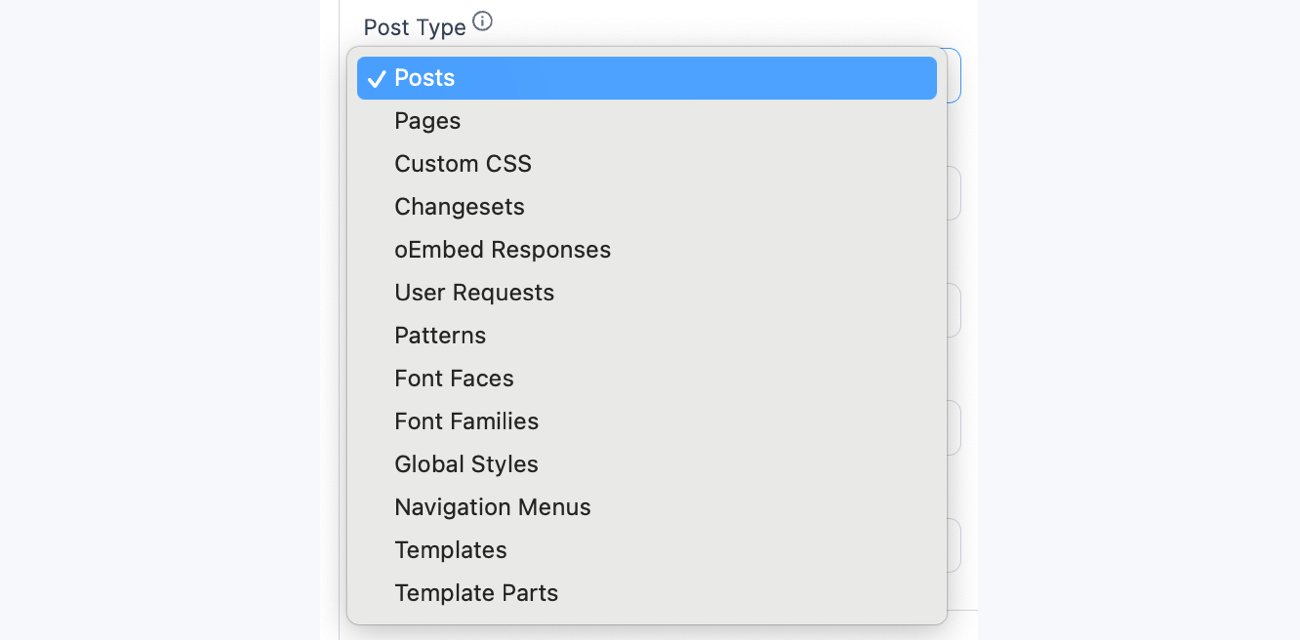
When you select a custom post type in the Post Type dropdown, the options in the Taxonomies/Categories section will update to show the taxonomies for the selected post type.
Create a WordPress page
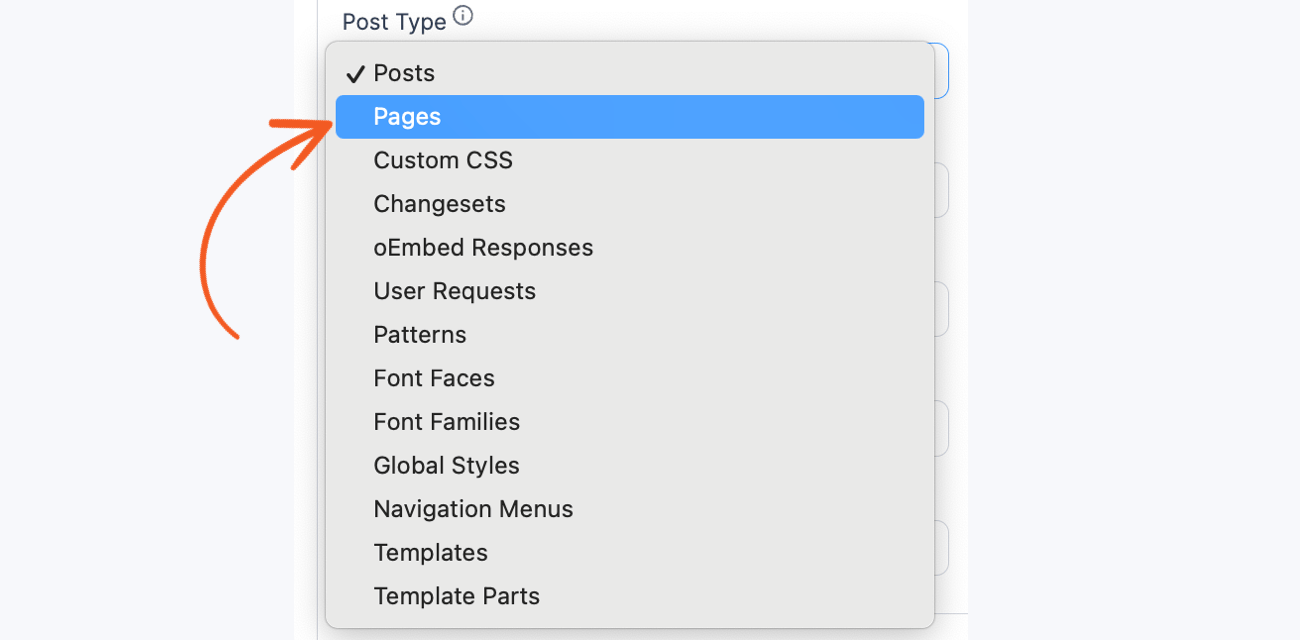
In addition to creating standard posts, Formidable Pro can be used to create pages on the front-end of your site. In order to create a page with Formidable Pro, follow the steps above to create a post, but select Pages in step 3 in the 'Post Type' dropdown.
Set page parent
If you create a WordPress page on your site with Formidable, you can set the page parent by selecting it from the Post Parent dropdown field. It is an autocomplete field that will display the post title and save the post ID. Note that this option only shows for hierarchal post types.

Set menu order
You can set the menu order for post types by selecting it from the Order dropdown field. Note that this option only shows for pages but not for posts.

Add a post status field
Set the status of your posts using a field in your form. This can be used to allow lower user roles to create draft posts which administrators can easily switch to published. This is also helpful if you would like to create a Formidable View that only shows published posts, for example.
- Go into your form's Settings → Actions & Notifications and open your 'Create Post' Action.
- Set the Post Status to 'Create New Dropdown Field'.

- Click Update.
- Go to the form builder page. A new post status dropdown field will appear at the end of your form with these options:

Note: If the user does not have permission to create posts, then the 'Published' option will not appear in the status field. - If you want posts to be created as drafts by default, select 'Draft' as the default value.
- If you only want administrators to see the status field, set the 'Visibility' to 'Administrator' in the field options.
Approve post before publish
Would you like an administrator to review and approve user-submitted WordPress posts before publish? Add a post status field to your form. The admin can edit the entry from the Formidable → Entries page and change the status from Draft to Published.
If you would like to approve posts on the front-end, first create a View set to show entries from this form. Include a filter in the view settings to only show entries with a status equal to 'draft'. Add a front-end entry update link in the view, with value='Published' included in the shortcode. Now when this edit link is clicked, the post will be published.
Edit a post
Posts can be edited from a Formidable form, whether they were created with Formidable or not. If the post was created in a different way, you'll have an extra step.
- Create a form for the posts as explained above. Be sure to allow editing on the form Settings → Permissions page.
- You'll need a link to edit posts using your form. If you would like the edit link to show on the post for anyone with permission, you can add the frm-entry-edit-link shortcode (or PHP alternative) in the theme template. There are other ways to create a list of edit links as well. See the front-end editing doc for more detail.
- If the posts are already entries in your form, you're done. The post ID is saved in Formidable, along with any values that are not included in the post form action.
When the post and entry are linked, the content is only stored in the post and isn't duplicated in the entry.
To link an existing post to your post form, go to the edit post page for each post. There, you can create an entry from that post.
Break the post and view connection
If you are using a form to create a post, and you have mapped the post content to a View, you will not be able to edit the post content through your WordPress admin. The post content will be filtered by the View that it is linked to.
If you would like to break the connection between the post content and the View so you can edit your post through the back-end, you may use the frm_after_create_entry hook.
Deleting posts
If you have created a post with an entry, then you have a few different ways to delete the posts and/or form entries.
Delete post and entry
If you would like to delete both the post and the entry, you can either:
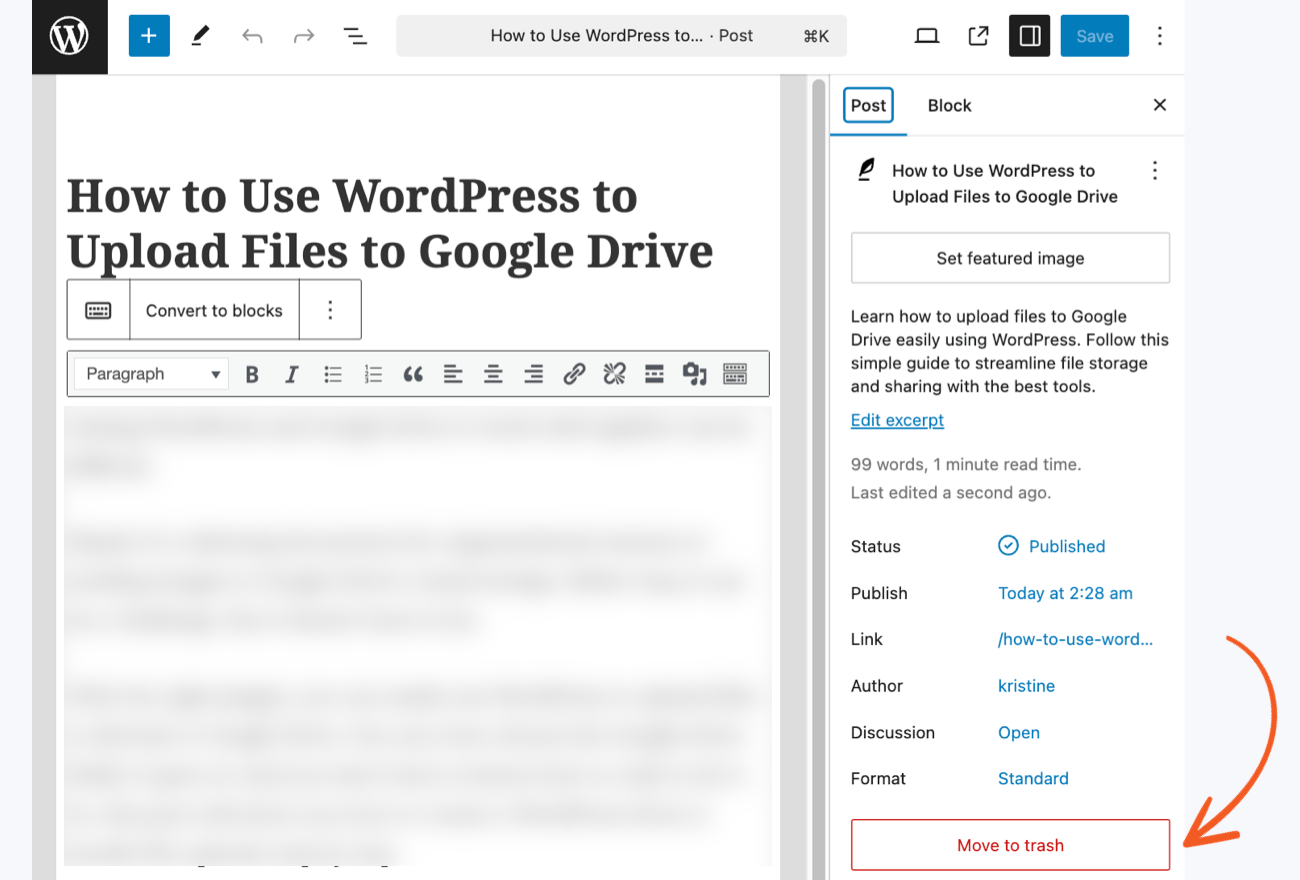
- Delete the post from the Wordpress posts section.

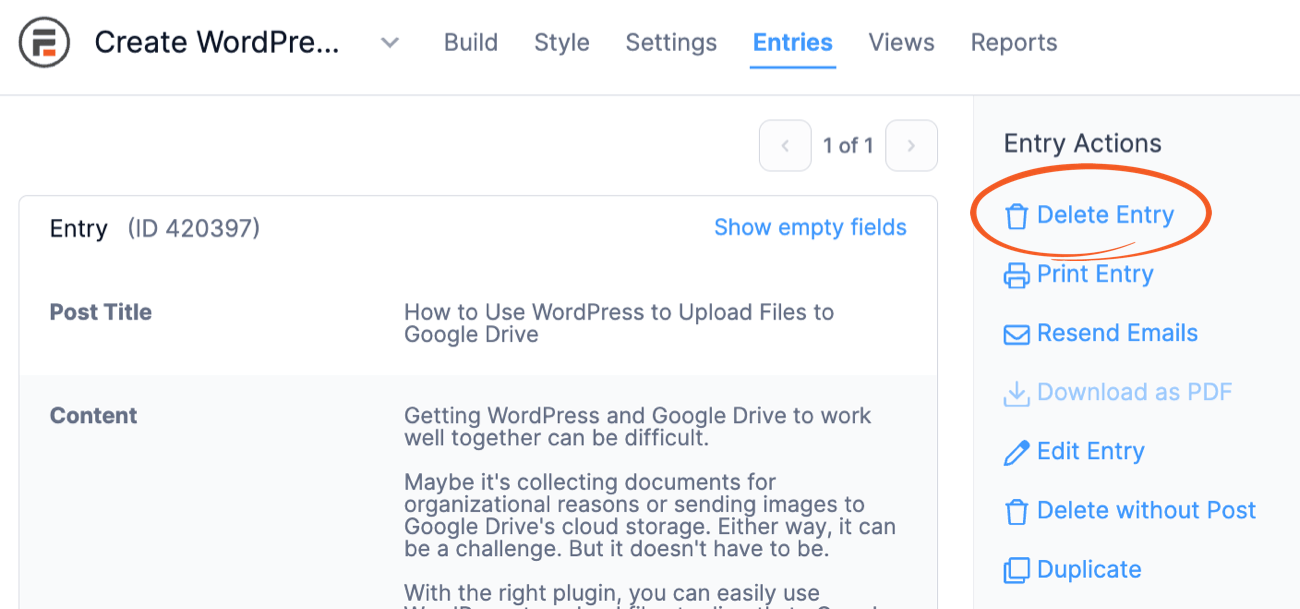
- Delete the entry from the form.

Delete entry only
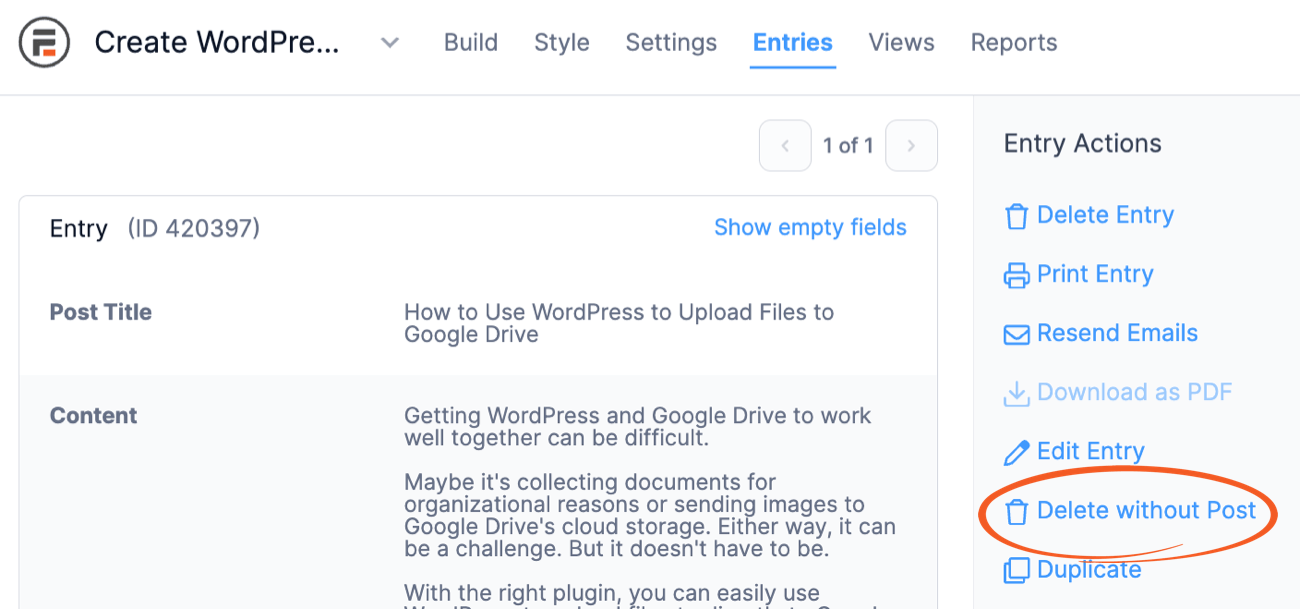
If you would like to only delete the form entry, but not the post, then you would go to Formidable → Entries and find the appropriate entry. When hovering over the first column on the Entries page, select "Edit" or "View". You can then click on the menu icon (circle with three dots) and select the Delete without Post option. This will delete the form entry, but leave the post within WordPress.
Manage posts
If you have assigned fields to a post, these can be sortable on the entries listing page. Entries can be sorted by post title, content, slug, excerpt, status, date, and meta.
If you want to customize the columns displayed on the Entries listing page, select the Screen Options tab at the top of the page.
Set the featured image
- Add a file upload field to your form. Note: WordPress allows only one featured image for a post, so it will not work correctly to allow multiple uploads in this field.
- Go into your form's Settings → Actions & Notifications and open your 'Create Post' Action.
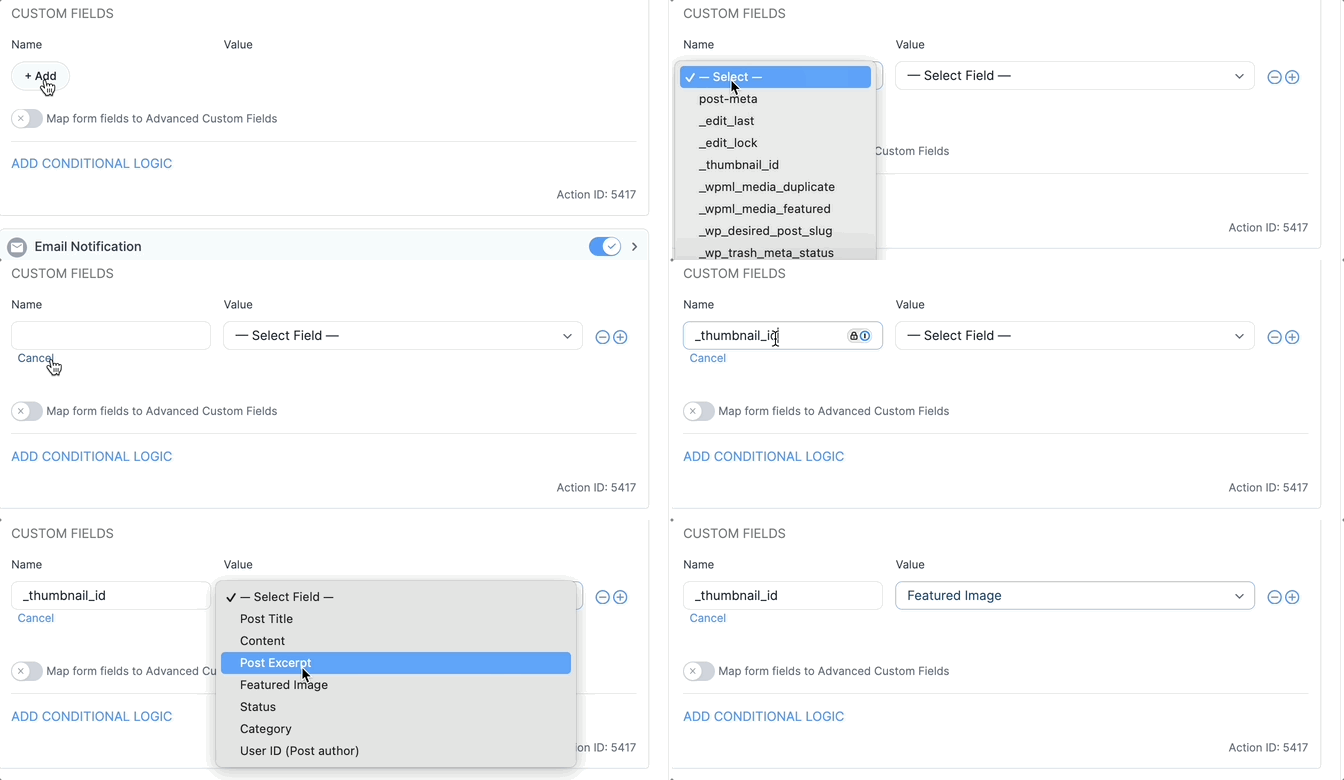
- Click the 'Add' button on the 'Custom Fields' row.
- Select '_thumbnail_id' from the drop-down, then select the file upload field that you would like to set as the featured image.

Add a category field
Follow the instructions below if you have a non-hierarchical category/taxonomy that you want to link with a field in your form. This will grab the categories you have previously added in the WordPress settings and use them as options in the field.
- Add a checkbox, radio, or dropdown field to your form.
- Go into your form's Settings → Actions & Notifications and open your 'Create Post' Action.
- Click the 'Add' button on the 'Taxonomies/Categories' row.
- In the first dropdown, select the taxonomy you want to use. In the second dropdown, select the checkbox, radio, or dropdown field that you created in Step 1. Click Update. This will populate your selected field with the items from the selected taxonomy.

Display a category
By default, when you show the value from a category field with [x], the output includes a comma-separated list of links to each category page. To show a list without links, such as when used in the redirect URL, use [x links=0].
To get the category ID instead of the label, use [x show=id links=0]. This is common for use in a url when redirecting.
Set a default category
- Add a checkbox, radio, or dropdown field to your form.
- Go into your form's Settings → Actions & Notifications and open your 'Create Post' Action.
- Click the 'Add' button on the 'Taxonomies/Categories' row.
- In the first dropdown, select the taxonomy you want to use. In the second dropdown, select the checkbox, radio, or dropdown field that you created in Step 1. Click Update. This will populate your selected field with the items from the selected taxonomy.

- Return to the 'Build' page and select the default category in the checkbox, radio, or dropdown field. This will insert the ID of the category as the default value. For checkboxes, use a comma-separated list of ids.

- If you don't want users to change the category, change the 'Visibility' to 'Administrator' in the field options.
Add hierarchical categories
If you have hierarchical categories/taxonomies, and you would like to display the different levels in different fields, follow the Multiple fields instructions below. When a parent category is selected, only the children for the selected category will appear in the next field. If you would like to display different levels in a single field where the children are indented, follow the Single field instructions.
Multiple fields
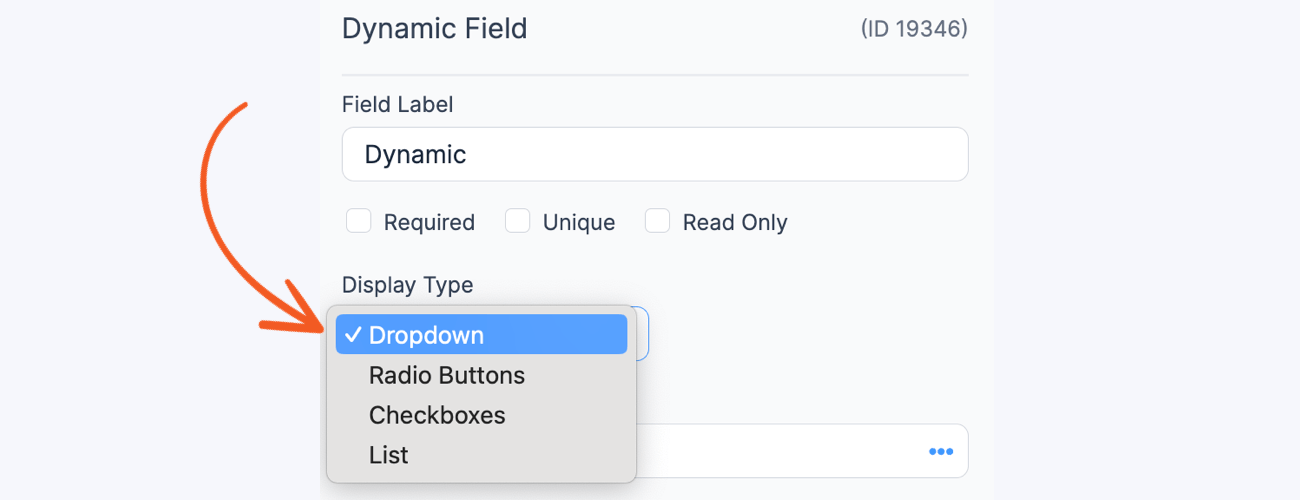
- Add a Dynamic field to your form (this will be your parent category field) and set it to display as a dropdown, radio button, or checkbox.

In the Load Options From dropdown, select Category/Taxonomy.

Note: If you don't want users to see this field, change the Visibility to Administrator. - Add a Dynamic field into your form (this will be your child category field) and set it to display as a dropdown, radio button, or checkbox. In the Load Options From dropdown, select Category/Taxonomy.

Add conditional logic to this field to display when: Parent category field equals to Anything.

- Go into your form Settings → Actions & Notifications and open your Create Post Action.

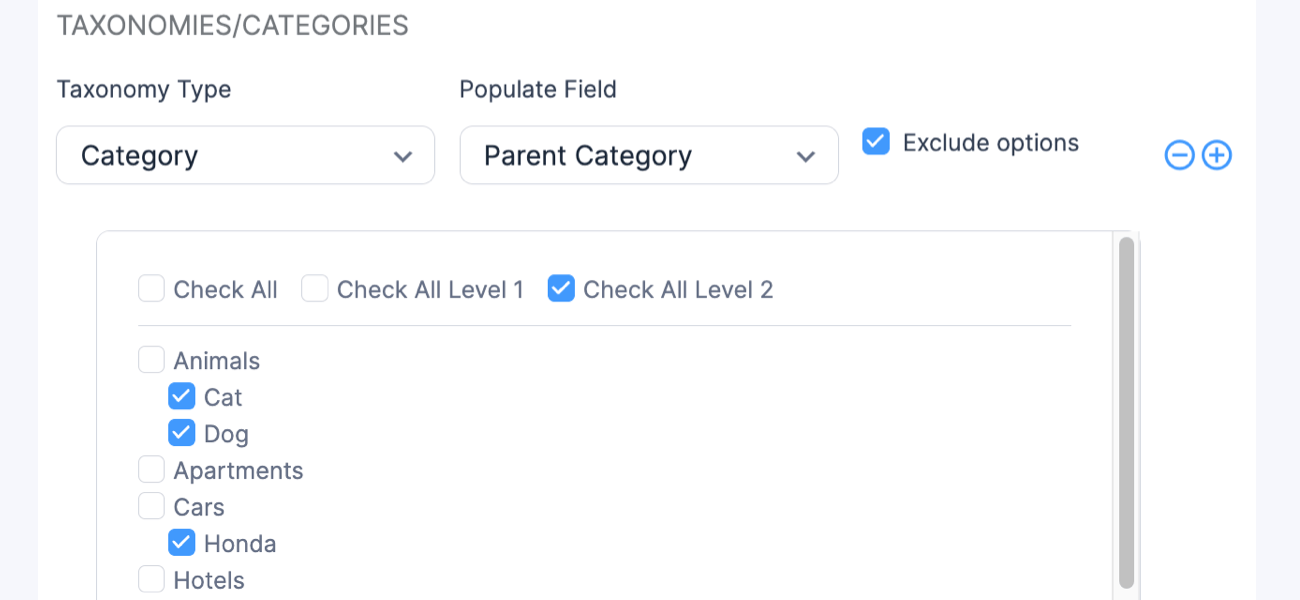
- Click Add under Taxonomies/Categories.
- In the first dropdown, select the category/taxonomy that you want to use.
- Then select the dynamic dropdown field that was created for the Parent category.
- Check the Exclude options.
- Select the Check All Level 2 checkbox to hide all level 2 categories, which are the child categories.

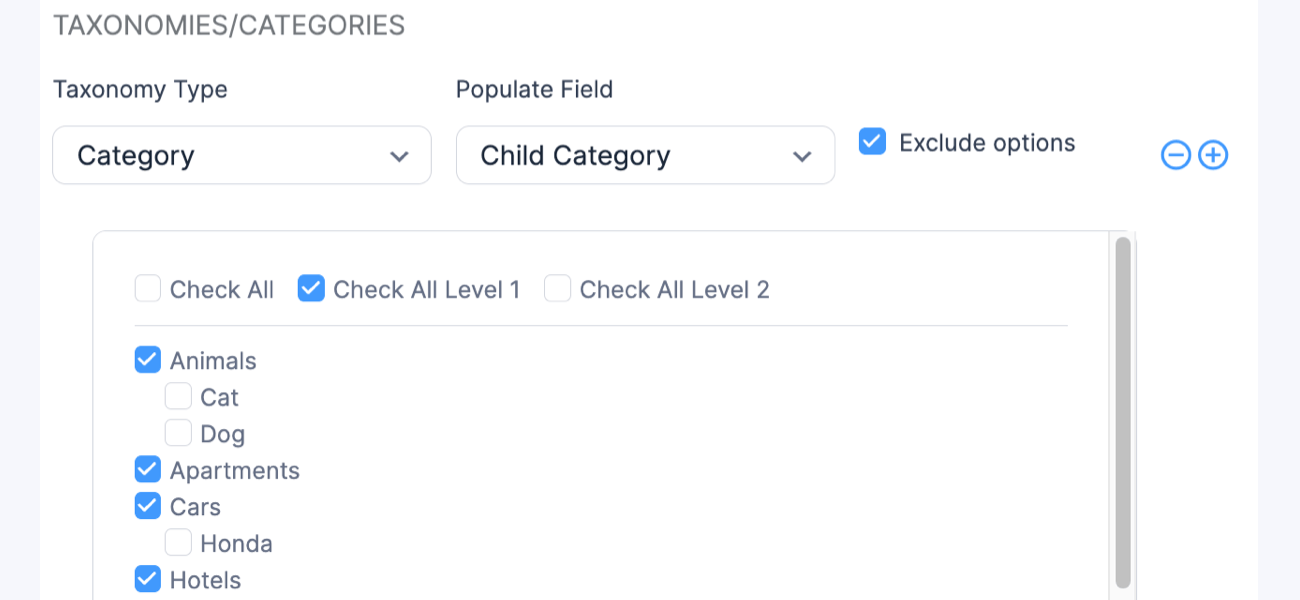
- Click Add under Taxonomies/Categories a second time.
- In the first dropdown, select the same category/taxonomy that you selected in the previous step.
- Then select the dynamic checkbox field that was created for the Child category.
- Check the Exclude options.
- Select the Check All Level 1 checkbox to hide all level 1 categories, which are the parent categories.

- Now, when you select an item in your Parent Category field, only the children for that category will be displayed in the Child Category field.
Single field
- Add a Radio Button, Checkbox, or Dropdown field to your form.
- Click Update and go into your form's Settings → Actions & Notifications and open your Create Post Action.

- Click Add under Taxonomies/Categories. In the first dropdown, select the category/taxonomy that you want to use. Then select the Radio Button, Checkbox, or Dropdown field that was created in Step 1.

Now, when you view your form, your Radio Button, Checkbox, or Dropdown field will be populated with categories. Children categories will be indented to provide a clear visual representation of the parent-child relationship.
Create a new category
Allow users to create a new, custom category with a Tags field. Read how to set this up on the Tags page.
Set a default author
If you would like to allow logged-out users to submit posts and you want to assign these posts to a specific user, follow the steps below.
- Go to your WP Users → All Users menu item and find the user you would like to set as the default post author.

Click the link to edit that user, and locate the user ID in the URL.

In the address bar shown above, the user ID would be 2. - Go into your form and add a User ID field if you don't already have one.
- Open the Field options for your user ID field, and insert the user ID (from Step 1) into the Default Value box.

Enable or disable comments
To turn commenting on or off for created posts, follow these steps:
- If you haven't yet, create a WordPress post.
- In the Create Post form action, locate the Discussion dropdown.

- Select from the following options:
- Use default. Select this option if you want to use the default setting in your WordPress → Settings → Discussions page.
- Allow comments. Select this option to enable comments for all future posts created using the Create Post form action.
- Disable comments. Select this option to turn off commenting for all future posts created using the Create Post form action.
Create a post listing View
Use Formidable's Views to create a post listing View. You may allow the user to go to the post when they click a "Read more" link or you may direct the user to the View's Detail Page that is not synced with the post.
Link to post
If you would like to create a post listing View with links to the individual posts, follow the directions below.
- If you have not already done so, set up your form to create posts. Make sure you have a View selected for the 'Post Content' option.
- Go into the 'Views' menu item and create a new View. Set it up to display 'All Entries'.
- Add content to your View's Listing page. Include the following in your Listing page:
<a href="[detaillink]">[x]</a>
Replace x with the ID of the post title field in your form.
- Publish the View. Now, take a look at your View and you should see a list of all post titles submitted in the form. When you click on a post title, you will be taken to the single post.
Link to View
If you would like to create a post listing View with links to your View's Detail Page, follow the directions below.
- Create a new Dynamic View for the form. Please note: This View may not be the same View selected in your Create Post action's Post Content setting.
- Add content to your View's Listing page. Include the following in your Listing page:
<a href="?entry=[id]">title-of-link</a>
Replace 'title-of-link' with text or a field ID of your choosing.
- Add content to the Detail Page of the View.
- Publish the View. When you take a look at your View, you should see clickable links. When you click on one of these links, you will be taken to the Detail Page of your View.
Create View by Post Status
If you are creating posts with your form, you may want to create a View that only shows posts that are published, or posts that are still drafts. If you would like to create a View that displays only draft posts for example, follow these instructions below.
- If you have not done so already, set up you form to create posts.
- If needed, add a post status field to your form.
- Create a View for the form you are using to create posts.
- Fill the View with any information you would like. For more information on creating Views, click here.
- Add a filter at the bottom of the View using the post status field. In this example, we will say 'Status equal to draft' as shown in the screenshot below.

Create entry from post
You may have posts that you have created using Wordpress. If you would like to add these posts as entries to a form which is set up to create posts, you have the option of doing so. This is helpful if you would like to have the option of updating the post via your form, or displaying the post in a View.
In order to create an entry in a form using an existing Wordpress post, your form must have a Form Action for creating posts. If this has not been setup, you can follow the instructions at the top of this page.
Then, you would access the post in the Wordpress admin menu and click on it. Here, you will find a box on the sidebar that says 'Create Entry in Form' and it will list all of the forms that the entry can be created in. You can simply click on the name of the form, and the entry will be created from your post.

Create post URL
If you would like to add your new post as a link to your email, follow the directions below.
- If you have not already done so, set up your form to create posts.
- Set up your form to send email notifications and include this in your Message box:
<a href="[siteurl]?p=[post_id]">[x]</a>
Replace x with the ID of the post title field in your form.
- Save the email form action. When you click on the post title in the email, you will taken to the to the post that has just been created.
Create custom post title
By default, you can only choose one of the fields as your Post title. If you want to create a custom post title using multiple fields, follow the instructions below:
- Add a hidden field in your form.
- Enable text calculations in the Default Value (Calculation) box.

- Set the default value to the field IDs that you want to use in the post title.
- In your Create a Post form action, select the hidden field as the Post title.

Create posts for existing entries
You may have existing entries submitted in your form before you enabled the Create Post action. If you want to create posts for those existing entries, follow the instructions below:
- Add a post status field in your form. You can have options like Pending and Published. Set the default value to Pending.
- In your Create Post form action, add conditional logic like Create this post if the Post Status field is equal to Published.
- On your Form → Entries page, click the Download CSV button to export all the entries in your form as CSV.
- In the CSV, update the entries by adding Published as the value for the Post Status field.
- Import the entries back to your form. To avoid duplicate entries, make sure that you map the User ID column in your CSV to the User ID field in your form.
- It will then trigger the post creation for the imported entries.
Allow editing while post is a draft
There is a difference between a draft entry in Formidable and a draft post in WordPress. In Formidable, an entry is a draft when the Save Draft link is clicked. Once the form Submit button is checked, it is no longer a draft.
When a user has a draft entry:
- The entry will still be listed when they return to the form.
- There will be no connected post when an entry is a draft.
- If you turn off editing, the draft entry will continue to be editable.
A WordPress draft post would need to be treated differently. To only allow editing while a post is a draft, you could do the following:
- Create a form for the posts and allow editing in a post.
- Create a View by post status that only shows posts that are Published.
- Then prevent editing on posts with their status set to Published by using this code example.
- Replace 45 to the ID of your form that creates the post.
- Replace 123 to the ID of the Post Status field to check.
- Replace Closed with Published to prevent editing.
Glossary
- Label: This is the label or title for the post action.
- Post Type: Typically, you will just see "Pages" and "Posts" show up here. Posts are what people usually do, but there can be a lot of different options. In order to see even more options here, install the "Types - Complete Solution for Custom Fields and Types" plugin. Then, use that plugin to create a new custom post type. The new custom post type should appear in this "Post Type" dropdown.
- Post Title: The title of the created post.
- Post Content: Either select a single field to be the post content, select an existing View, or create a new View. If you select an existing View or create a new View, then that View content will be used to create your post content.
The Customize Content box allows you to customize the content for your post. This Customize Content box is synced with whatever View you selected/created in the "Post Content" settings. - Excerpt: Can be displayed in places where quick summaries are preferable to full content.
- Post password: In case you want to password-protect the post.
- Slug: This will be the URL/permalink for the post.
- Post Date: Every created post has a post date. If you have a date field in your form, you can select that here, but most of the time, you will want to select "Date of entry submission".
- Post Status: You can select whether the post will be published automatically or remain a draft at first. you can also add a dropdown field to the form with the different status options.
- Taxonomies/Category: This section allows you to add categories or tags to the created post. It works in two different ways. Either add a Dynamic Field to your form and set it up to use categories/taxonomies, or select the options (in the post action) to create "A New Checkbox field".
- Custom Fields: This is where you can create your meta-data and featured images.
Related customizations
Increase the custom field limit
By default, a maximum of 50 options are included in the custom field settings. If the option you are looking for is not included, either type in the name or the limit can be increased. A very high limit may be resource-intensive.
add_filter( 'postmeta_form_limit', 'increase_custom_field_limit' );
function increase_custom_field_limit( $limit ) {
	$limit = 999;
	return $limit;
}
Change post date
Use this code snippet to change the Post Date to NOW if the Post Status is changed from draft to publish. It includes two filters: frm_after_update_entry and frm_pre_update_entry. Change the $status_field_id from 5167 to your Status field ID in the Create post form.
global $my_frm_post_drafts;
$my_frm_post_drafts = array();

function update_post_timestamp_on_status_update( $entry_id ) {
	global $my_frm_post_drafts;
	if ( array_key_exists( $entry_id, $my_frm_post_drafts ) ) {
		$postarr = array(
			'ID' => $my_frm_post_drafts[ $entry_id ],
			'post_date' => gmdate( 'Y-m-d H:i:s' )
		);
		wp_update_post( $postarr );
	}
}
add_action( 'frm_after_update_entry', 'update_post_timestamp_on_status_update' );

function check_values_before_update( $new_values, $entry_id ) {
	$status_field_id = 5167; // change 5167 to your Status field ID in the Create post form.
	$meta = $new_values['item_meta'];
	if ( isset( $meta[ $status_field_id ] ) && 'publish' === $meta[ $status_field_id ] ) {
		$post_id = FrmDb::get_var( 'frm_items', array( 'id' => $entry_id ), 'post_id' );
		if ( $post_id ) {
			$post = get_post( $post_id );
			if ( $post && 'draft' === $post->post_status ) {
				global $my_frm_post_drafts;
				$my_frm_post_drafts[ $entry_id ] = $post_id;
			}
		}
	}
	return $new_values;
}
add_filter( 'frm_pre_update_entry', 'check_values_before_update', 10, 2 );
Related developer hooks
- Modify the post before it is created with the frm_new_post hook.
- Delete the entry, leave the post with the frm_after_create_entry hook.
- Break the connection between the post content and the View with the frm_after_create_entry hook
- Set the post status based on the user role with the frm_new_post hook.
- Save the ID of created post in a field with the frm_after_create_entry hook.
Related Articles
Related Videos












 How to Edit Posts From the Front-End in WordPress
 How to Display WordPress Custom Post Types From User-Generated Content
 How to Allow User Submitted Posts in WordPress Forms