Want more control over your Divi contact form styling? This guide will show you how to customize your Divi contact form design to stand out!

Approximate read time: 4 minutes
A contact form is the primary way your visitors can contact you.
Whether for email marketing, lead generation, or simply reporting a problem, a contact form will help you do it. And it doesn’t hurt if it looks good, too. But how do you customize your contact form using the WordPress Divi theme?
Don’t worry.
This post will show two ways to style your contact form (and other forms) for Divi:
- Divi’s builder for forms
- A 3rd-party Divi form builder
Let’s get started.

How to style your contact form with Divi
Divi has a simple design editor built into its page builder.
So, go to Pages in your WordPress dashboard and choose the page you want to show your form on.
Next, click the button to edit with the Divi builder.
Once the page builder loads, click to add a new block. You can choose any Divi contact form layout you want, but for this example, we’ll choose a single block.
Next, search Divi Contact Form Module and add it.
Once you add your form, click the Design tab to change the elements and input fields and customize the module settings. You can change the fields, text, buttons, and more to make your form unique. Once you’re finished editing, click the checkmark button to save your changes.
If you’re familiar with CSS, you can edit your Divi contact form’s CSS by clicking Advanced, then Custom CSS.
Pretty easy, right?
Check out this free Divi form builder if you want more power over your forms and design.
How to style your Divi contact form with a form builder plugin
The form plugin we’re talking about is Formidable Forms.
It’s the most advanced WordPress form builder you can find. But don’t let “advanced” put you off. It’s effortless to use.
Best of all, it’s free.
Formidable has a premium option with many great features, which we recommend. But you don’t have to pay for the awesome design tools Formidable gives you.
So, get Formidable installed and activated then we’ll get started.
Designing your Divi form has three quick steps:
Let’s dive into it.
Step 1: Create a form
In your WordPress dashboard, go to Formidable → Forms and click the Add New button in the top left.
You can start one of our pre-built templates, which saves you a TON of time. But you need a premium plan.
If not, you can choose Blank Form to start from scratch.
Next, give your form a name and click Create.
The plugin will take you to its drag and drop form builder, which makes form building simple. Drag and drop the field you want, then customize it in the field settings on the left.
Radio buttons, checkboxes, date/time pickers, and more are all available.
For a contact form, we recommend a Text, Email Address, and Paragraph field for a basic form. You can add extra form field types like file uploads, spam protection (like Google Recaptcha or Cloudflare Turnstile), or even conditional logic to make your form stand out.
You can also save time by using one of Formidable's many pre-built WordPress form templates. For example, the Contact Us form template can be created in minutes.
Once you’re finished customizing your form, it’s time to give it a makeover. But before you do that, click Update to save your changes.
Next, we’ll head to the Style tab.
Step 2: Edit the style
Formidable’s Visual Styler makes it easy to change how your form looks.
Plus, it has a few pre-made design templates for premium users to customize everything in one click.
If you want more control over your form, click the three dots in the corner of the template, and choose Edit.
Here, you can customize every part of your form. Title, description, colors, submit button, fields, font size, and more.
And as you make the changes, you’ll see them on your form in real-time.
Feel free to play around with the different options to make the form exactly what you want! Plus, just like the Divi form CSS, you can customize the CSS of your Formidable form, too.
Then, click Update to save your changes.
Now we just need to display your form!
So before you leave the Style tab, click Embed → Insert manually and copy the WordPress shortcode.
You’ll need it in the next step.
Step 3: Publish the form
Head to the post or page with your Divi layout where you want to display the form.
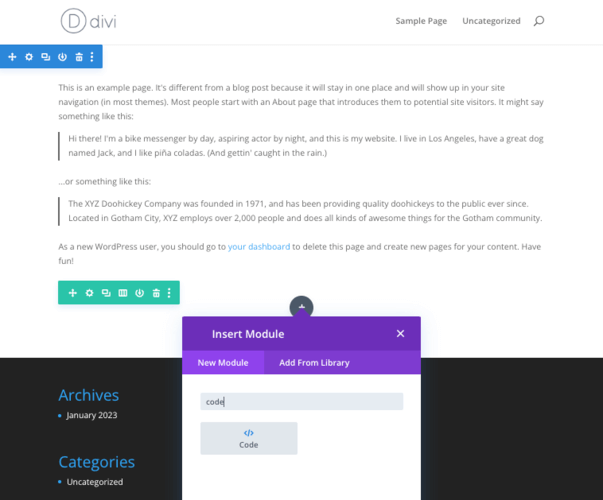
Then add a new Divi module, and search for Code.

Add the module, then paste the shortcode you copied in the previous step into the box.
Once you click the checkmark button, your form is ready to go!
Why use Formidable Forms for your Divi contact form styling?
Formidable’s styler makes designing the form page layout simple, but it doesn’t stop there.
It’s also fantastic at handling what you want to do after the user submits the form.
Show a success message, redirect them to another page, or even show them gated content. With Formidable, the power is in your hands, and you can decide.
Plus, you get tons of great features:
- Many form templates to speed up form building
- Unlimited contact form submissions to never miss a message
- Conversational forms to help increase conversions
- Landing pages to create an entire contact page
- Email notifications to alert you or connect with a visitor
But we recommend checking the full feature page to see how Formidable benefits you.
Are you ready to customize your Divi contact form design?
Form design is tons of fun once you start to play around with it.
And whether you use Divi or Formidable Forms, you have the tools to make your form stand out.
So, if you’re wondering, “How do I style a Divi contact form success message?” This post on designing your success message is for you.
Last, follow us on Facebook, Twitter, and YouTube for more WordPress tips and tricks!
 How To Create an Employee Engagement Survey [5 Steps!]
 How to Use Custom Forms with Themify Ultra WordPress Theme
I'm replying to update on this problem and an interim solution, which CampusPress helped me with. I'd mistaken the problem I experienced as being dependent on which browser I was using. Instead, it had to do with how I was logged in. CampusPress has a custom site setting in the WordPress Settings>Reading Dashboard that permits specifying a site-wide password -- any visitor who knows that password can proceed to the site, without a login name. Trouble is, Formidable's CSS styles attempt to load before that password check, but can't be applied then. So when I was logged in with developer credentials, all was good. But on any other browser or machine, the styles wouldn't apply. That pertained not just to the Divi stylesheet here, but to the default Formidable styling, as well; it's just that I'd only noticed the problem while attempting to set up the Divi FF style. The workaround has been to paste the necessary CSS from FF's stylesheet into Divi's Theme Options area in the dashboard. That way, even though the CSS styles don't apply at first when they should, they do apply via the Theme Options. I think CampusPress may be following up with Formidable to see if they might be able to come up with a better solution by changing when the CSS gets called, but for now, this workaround does work.
Thanks for sharing these details and the work-around. We'll look into this and see if there is a better way to load that CSS so it works better with CampusPress.