WordPress user registration is a crucial step for most successful websites. Need to enable user registration in WordPress? Learn how to do it today.
If your website doesn't have WordPress user registration, you're missing out on many opportunities.
From commenting to adding posts, users need a way to sign up and do things on your website. Registering a user on WordPress is super simple.
Get WordPress User Registration Now!
So, in this post, we'll show you how to enable WordPress user registration on your WordPress site.
Let's get started.
How to allow WordPress user registration (2 ways)
You can register users on your WordPress site in two ways: using your WordPress dashboard or a form WordPress plugin.
We'll cover both so you can decide which is best for you.
Register users using WordPress
Right out of the box, the quickest way to add a user in WordPress is to go to the Users → Add New page. This is where you can manually invite new users to a WordPress website:
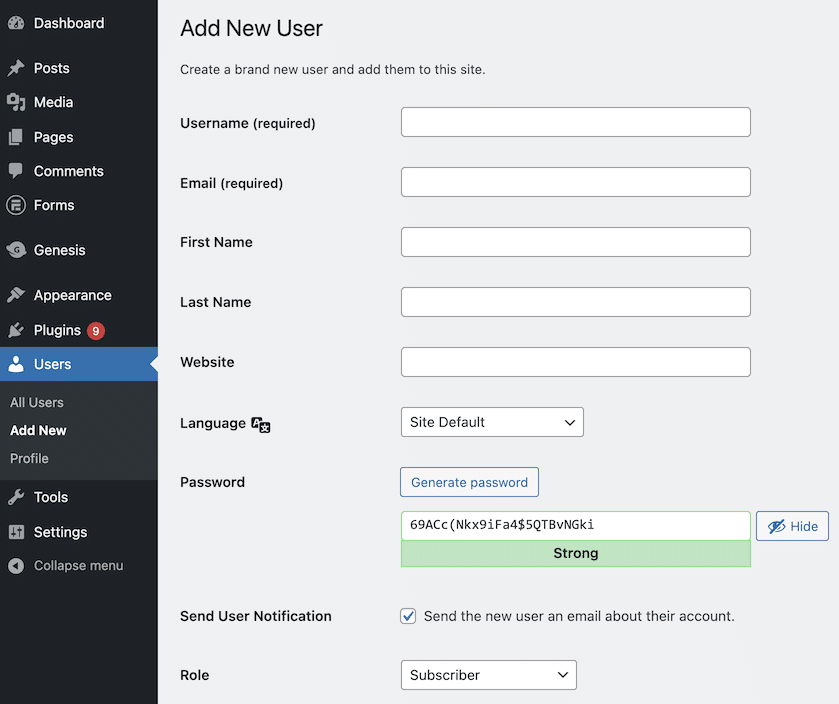
This page includes all the basic user information and a way to select the user role when registering on your website.
When it comes to letting visitors register their own accounts, WordPress includes an option called Anyone can register.
This setting is included on the Settings → General page, and you should know it's turned on by default:
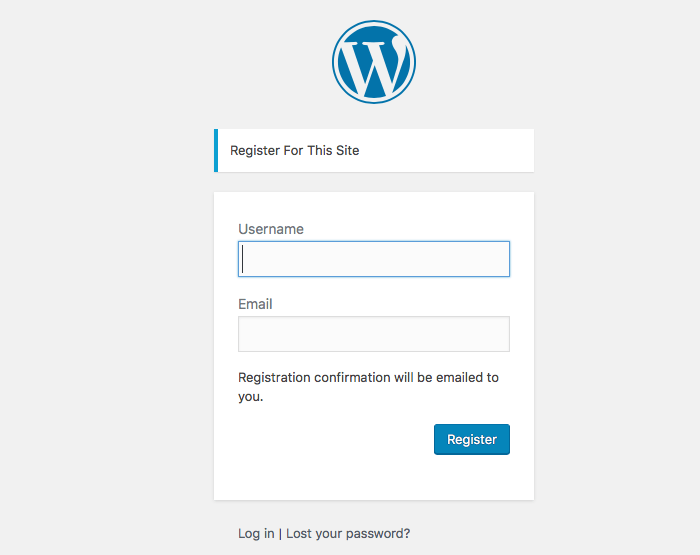
The problem is the URL to register is the same as every other WordPress site out there. Unfortunately, this default setup can end up with loads of spam registrations.
So, we recommend keeping this option off. If you'd like users to be able to register themselves, it's best to create a custom option hidden from all those bots scouring the internet.
Fortunately, creating your own registration page for new users can be easy. And we'll show you how in three easy steps.
Register users using a WordPress form plugin
Note: For this walkthrough, you'll need the premium version of Formidable Forms. It's the best drag and drop form builder plugin for WordPress. Make sure it's installed and activated before you begin!
Step 1: Set up the User Registration plugin
First, you must install and activate the WordPress User Registration plugin. This add-on will help you create a custom registration flow wherever needed.
To install it, go to Formidable → Add-Ons. Then, find the option labeled User Registration and click on Install. After that, you can adjust the settings by going to Formidable → Global Settings → Registration. You'll then see a page that looks like this:
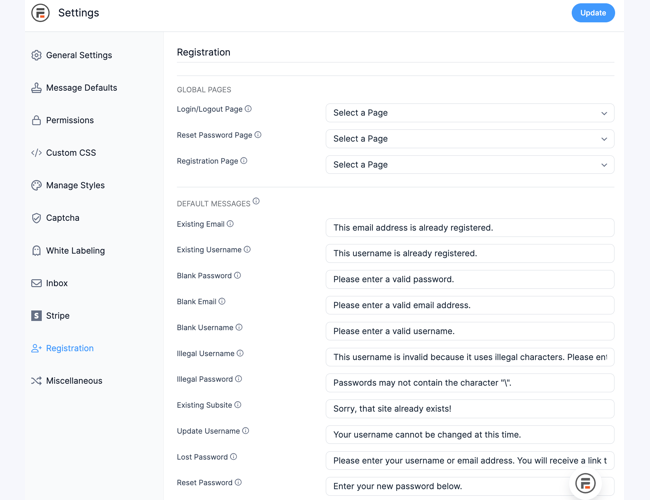
You'll see the settings for global pages at the top. For now, we'll focus on the last one: the Registration Page.
This field is optional. If you leave it blank, visitors will see the default WordPress user registration form. However, if you want to use a custom process, select the page where you'll publish the signup form instead.
If you've decided to create a custom login page, this may also be a convenient time to adjust those settings. Save your work, then move on to the next step.
Step 2: Create a custom registration form
Now, we can move on to creating the custom form itself. Go to Formidable → Forms → Add New. First, decide whether to start from scratch or use one of our templates. We went with the User Registration form template:
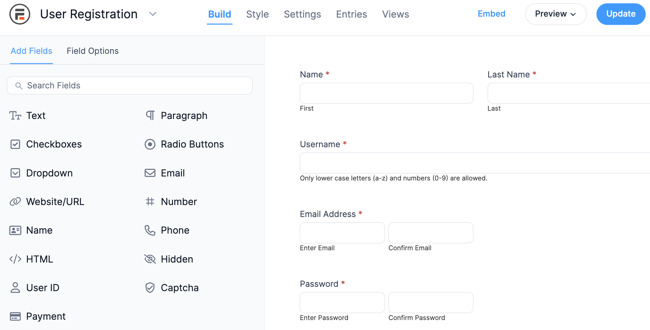
Adjust the form fields as necessary. You have a lot of freedom as long as you include an email address. The rest, including password fields and the username, can be auto-populated.
Also, if users need to set up multiple accounts at once (like a school club registration), you can add a Repeater field and then adjust the registration settings to create them all at once.
This saves users a lot of time.
Click on Update when you're done. Next, navigate to the Settings tab at the top. Click through to Actions & Notifications → Register User:
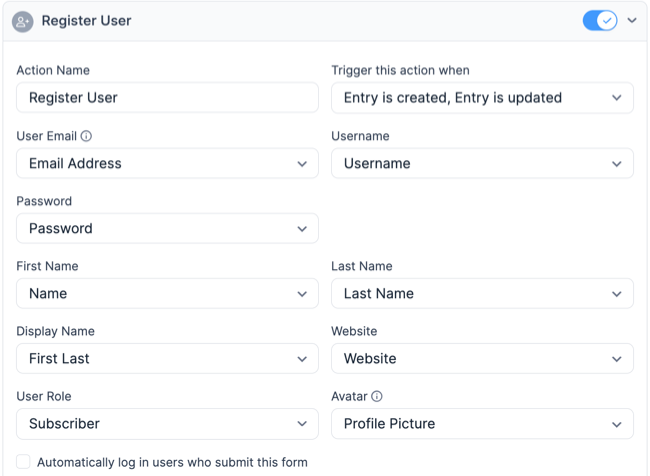
A lot of these defaults will probably be fine. However, you can also customize these settings. For example, the default for Display Name is the First and Last field. If you only want to display the first name, you can change it to only First.
As you scroll down, you'll see a few other options, including:
- Automatically log users in as soon as they register
- Require an email confirmation to verify their new account before full registration
- Activate the WordPress select user role at registration action
Save your work. Then, publish it on the page you chose in step one. You can also add a login form to replace the WordPress version.
This is just another reminder: Go to WordPress Settings → General and uncheck the Anyone can register box if you don’t want the default WordPress registration page to remain accessible.
Step 3: Enable logged-in users to edit their profiles
At this point, you should have a working form to create new user accounts. However, the website audience may need to edit their information after signing up. Fortunately, you can let them do so from the same form.
Go to Settings → Form Permissions. Then, check the Limit number of form entries to one per (logged-in user) and Allow front-end editing of entries boxes:
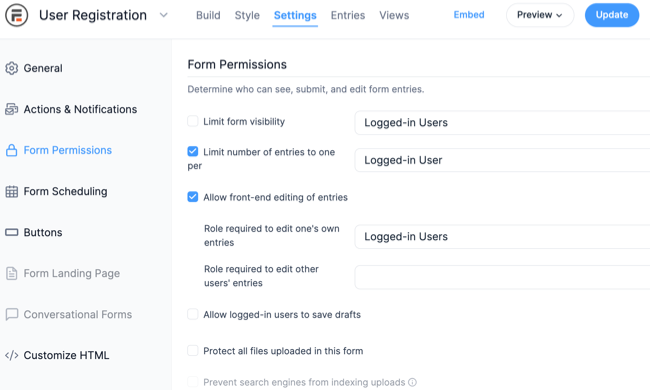
If you'd like to limit user edits to certain fields, set Visibility to Logged-out Users for each field you do not want edited. By the same token, you can make specific fields only visible to logged-in users by setting Visibility to Logged-in Users.
By applying both fields, logged-out users will see the basic form. However, logged-in users will have the opportunity to change their information on an account page. These simple changes can help keep the site up to date.
You also have fine-grained control and can limit fields to certain user roles. With help from the Members plugin, you'll even be able to create fully custom roles.
Ready to enable WordPress user registration on your site?
The default WordPress user registration isn't for everyone.
If your site has specific needs, you can create a unique new user login and registration flow with Formidable Forms instead.
Either way, we hope this guide helped you and your website. Let us know in the comments what you plan on using WordPress user registration for!
And last, follow us on Facebook, Twitter, and YouTube for more WordPress tips and tricks!
 Formidable Forms' NEW User Registration Repeater Speeds Up Creating User Accounts
 How to Create WordPress User Accounts [5 Steps!]
 7 Best Ways To Stop WordPress Registration Spam
Thanks, very cool
Hi,
There are a few places where the form in the instructions is different from the form being built.
Jim