Want to use WordPress to create a custom login form for your site? Learn how to create a login form in WordPress that you can add anywhere on your site!

Approximate read-time: 7.5 minutes
If you want to create a custom login form in WordPress, you aren’t alone. Having a website where users can register with a username and password is a very popular feature.
It’s such a popular feature that it’s actually built into WordPress by default. You’ve probably seen the default WordPress login screen before with the WordPress logo:

That’s the WordPress login page that admins & users log into WordPress sites with. Although it works well in some cases, you want your WordPress site to be customized - don’t you?
If you are building a WordPress membership site, having a custom WP login form is a must.
For many user-oriented sites, you’d want users to register & edit their profile from the front-end of your site, not the back-end (also known as the WordPress admin or the WordPress dashboard).
Inviting users to your WordPress admin is a little bit like inviting restaurant guests into the kitchen. There might be some stuff there that you wouldn’t want them to see! Depending on what kind of site you are building, this could be a deal-breaker.
In this step-by-step guide, we’ll show you how to add a login form in WordPress the easy way. But first, we’ll cover some user registration basics. Let’s get to it!

WordPress custom login forms with a plugin
In reality, a login form is very basic. There aren’t very many elements involved in the form itself. However, making the entire user registration system work properly is a bit more complicated.
So in this tutorial, we are keeping it simple by showing you how to set up a custom login form with a WordPress forms plugin - Formidable Forms. Formidable can also handle every other form on your WordPress site too.
Create a custom login form in WordPress without a plugin
Of course, you could still do this the hard way. WordPress includes user registration features by default. But without a plugin, you’d need to do a bit of coding if you want a custom login form.
First, you’d need to work from your wp login.php file and other php files in WordPress. That’s a bit difficult unless you know how to code in PHP... plus, you could end up breaking your site if you make a mistake.
And depending on your WordPress theme, you may need to do a lot of coding for your custom WordPress login form. Not all themes are created equal...

Then there’s the matter of building your custom login form & configuring it to allow user registration and user login. Doing that requires even more coding & customization.
Finally, you’d need to style your form to match your site using custom CSS... this is probably starting to sound like a lot of work!
Or you could just get Formidable and install our user registration add-on! And then you can use our built-in visual form styler to make your login form match your site.
How to create login forms in WordPress
Here are the steps needed to create a custom login form for your WordPress website:
- Install and activate Formidable Forms
- Install and activate the user registration add-on
- Create and publish your custom login form
- Create a reset password link and page
One more thing before we get started...
This tutorial is all about the custom login form. But you may also need to create a WordPress custom login page as well.
And if you haven’t already, you’d also need to create an online registration form so that users can register too. Luckily we’ve got both of those things covered in a couple of separate posts:
? How to Create a Custom WordPress Login Page
? How to Create a Registration Form in WordPress
1. Install and activate Formidable Forms
First, let’s install Formidable Forms. We do have a powerful free plugin, but to access the user registration add-on, you’ll need to unlock the business plan.
We really want you to give this tutorial a try. So we made things easy: you can use Formidable risk-free for 14-days. If you don't like it, we'll refund all your money, no questions asked.
Formidable can handle all your user registration, but it can do much than that. It’s a complete form building solution! We think you’ll like it. ?

2. Install and activate the user registration add-on
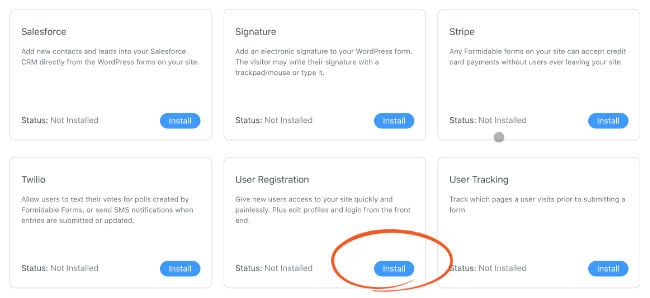
This part is really easy. All you need to do is go to your WordPress admin, then go to Formidable → Add-Ons and click the 'Install' button for the User Registration add-on.

There are a ton of options that can be configured with the user registration add-on, so feel free to explore the settings section in Formidable. We’ll cover a few of them in the following steps, though.
? Learn more: WordPress User Registration Forms
3. Create and publish your custom login form
Now we need to create a custom login form for your WordPress site. Here’s the best part... it’s already done! Formidable’s user registration add-on comes with the user login form included.
Styling your custom login form
There is one thing you can do though: style your form with the visual form styler. This is how you can make sure your login form matches your website style.
To get started with that, go to Formidable → Styles.

From the form styler interface, you are able to make styling templates that can be applied on a form-by-form basis. Since you make changes visually, you don’t need to know any coding to make your forms look great.

? Learn more: Customize Form appearance with the form styler
Publishing your login form
Once you’ve made your adjustments, there’s one more thing. With Formidable, you can place your forms anywhere on your site and redirect to other pages. The visual form styler allows you to have a different style for each form.
With a login form, you might want to place one login form in a sidebar or footer widget. And you might want a different style for your login widget or form. So you should create styles for each area you want to place your login forms.
When it’s time to publish your login form, this can be done in a few different ways:
- Insert the login shortcode with a block
- Insert the login shortcode manually
- Use the Login Form widget
The shortcode for publishing your login form in Formidable is always the same:
[frm-login]
In Formidable, there are a bunch of ways to format the above shortcode by adding parameters. The most important parameter is the one used to set the login form style.
To choose the correct style for each login form shortcode, go back to Formidable → Styles and copy the CSS class for the style you want to use.

Then you just add that CSS class to your login form shortcode like this:
[frm-login class="frm_style_formidable-style"]
Just replace "frm_style_formidable-style" with the correct CSS class. That’s it!
? Learn more: How to add a login form to your site
4. Create a reset password link and page
The last thing we want to do is create a reset password link and a page where users can reset their passwords. Unless you have a robotic memory, you’ve probably needed to reset one of your passwords before.
And you probably took that feature for granted... until now! Luckily, this isn’t too difficult in Formidable.
There are a few details needed to make a password reset system work. First, we need to include a reset password link on your custom login form.
If you are using a widget to display your login form, the link can be added by checking a box in the widget options.

If you are using a shortcode to display your form, you can add a parameter to your shortcode like this:
[frm-login show_lost_password="1"]
Next, you need to create a reset password page on your WordPress site. Once you’ve set up your entire user login system, you’ll want to design this page to match your site. For now, we just need to copy and paste this shortcode into the body of the page:
[frm-reset-password]
After that, go to Formidable → Global Settings → Registration. In the 'Global Pages' section, set your 'Reset Password Page' to the page you just made.
![]()
Then, click Update Options. Now all your login forms will have a reset password link! When the link is clicked, it will take logged out users to the password reset page. Then, users can reset their password in much the same way they’ve done on other sites a million times before.
? Learn more: Create a Reset Password Page
Wrapping up
That’s all there is to it. Although there was some setup time, creating a WordPress custom login form with Formidable Forms is a lot easier than learning how to code.
We hope you’ve enjoyed this tutorial. For more WordPress tips, check out the Formidable blog.
Read more about user registration
If you aren’t using Formidable Forms yet, you’re missing out! Besides user registration, you’ll find dozens more online form builder features. Get started with our free WordPress plugin or try Formidable free for 14-days.
 Formidable Forms' NEW User Registration Repeater Speeds Up Creating User Accounts
 How to Create WordPress User Accounts [5 Steps!]
 7 Best Ways To Stop WordPress Registration Spam
Where can we edit the default [frm-login] template?
For example, We would like to add a Sign-Up button next to the Login button
How to add Google reCAPTCHA on formidableforms login form. Kindly help me with this.
Hi there,
This isn't currently supported, but we are working on a solution that would allow more customization to the login form including reCaptcha.
Sorry this isn't currently available.
Did you ever find a solution or workaround?
Thanks!
I am also getting slammed with spam user registrations, I have catpcha v2 on registration form, but I need it on the login form and reset password form. Is there a possible solution or a workaround? I would like to stick with formidable for all my needs and not add another plugin.
May I suggest you link the text "by adding parameters" on this page to:
https://formidableformscom.bigscoots-staging.com/knowledgebase/user-registration/add-login-form-to-your-site/#kb-label-parameters
I had a lot of trouble finding the parameters myself until Bobby on the forum pointed them out. It is not intuitive that the "How to add a login form to your site" on this page above the section mentioning the parameters is where one would go to find the parameters. I assumed that "how to" link was basic information or a repeat of what was on this page - since this is the page that was supposed to be on customizing the login form 🙂
Thanks for the suggestion Chris. I'll let our documentation team know now!