Want to thank your users after they submit a form or make a purchase? Here’s how to create a thank you page in WordPress to show appreciation and boost sales!

Approximate read time: 6.5 minutes
Have you ever clicked “Submit” on an online order or registration form and wondered whether your submission went through?
You haven’t received a confirmation email; no thank you message popped up on the screen.
It's frustrating. And it can be costly, too.
If you start hitting the back button, refreshing the page, and resubmitting the form, you could order the same thing three times.
You certainly don’t want anyone to have this kind of experience on your website!
But a well-crafted thank you page can go beyond simply showing gratitude and reassuring customers.
Here’s why and how to create a thank you page in WordPress to win over your users:
Why create a thank you page in WordPress?
Showing a WordPress thank you page after form submission can do much more than just letting your users know you value them. It can also help you boost sales and increase conversion rates.
Instead of displaying a boring default “Thank You” message after a user submits a form or makes a purchase, displaying a custom thank you page can encourage them to take the next steps and maybe even purchase other products or upgrade their subscription.
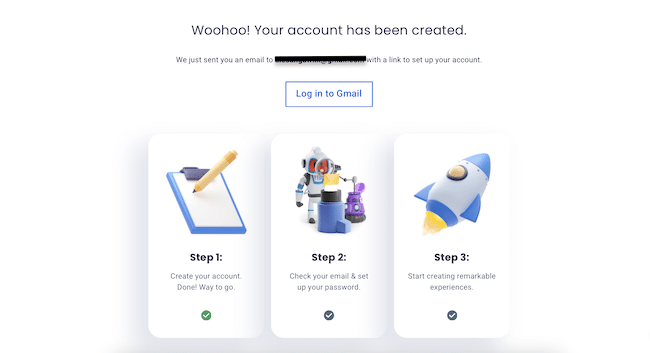
Here are a few examples of how to use a thank you page to improve your WordPress website:
- Give visitors a free file download when they sign up to your mailing list
- Provide WooCommerce order tracking details
- Offer helpful resources and links to support documentation when a contact form is submitted
- Customize a WooCommerce thank you page to match your brand identity
- Thank new members for joining and remind them of website rules, terms, and conditions
- Suggest related content or encourage users to follow you on social media
A well-designed thank you page can distinguish between an okay user experience and an excellent one. Luckily, creating a thank you page in WordPress isn't hard.
The problems come when connecting a thank you page to your WordPress forms or eCommerce orders - and that’s where Formidable Forms shines!
So, what does a good thank you page look like?
Thank you page examples
Understanding your audience’s needs at that particular point in the customer journey is key to creating an effective thank you page.
Like all good landing page examples, good thank you pages let users know what they’re getting and what happens next. Thank you page sections should, of course, include a message of appreciation, but they should also feature a call to action (CTA) to inspire visitors to spend more time on your website.
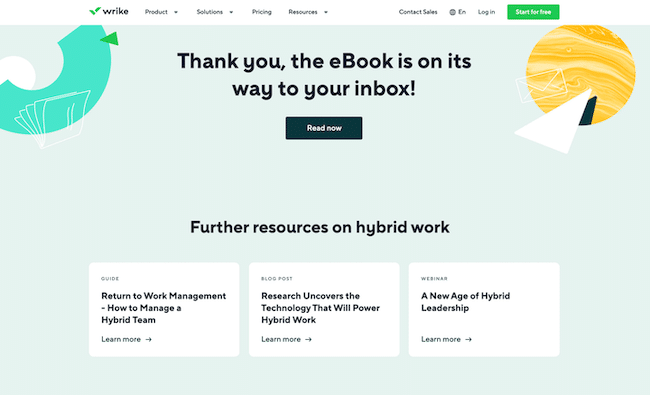
In the same way, a landing page button's purpose is to get users to click and take a specific action on your site, a good thank you page should have a clear goal and limit distractions.
Here are a few ways we use thank you pages in WordPress:
Thank you page with order information
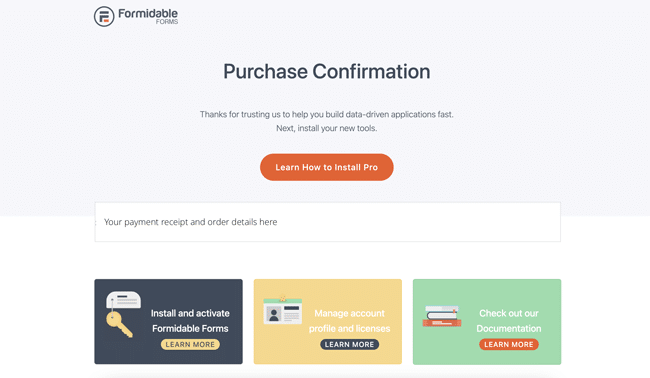
This simple thank you page for an order confirmation includes a CTA button to help our users get started immediately. We also include a recap of their order and offer some tips for getting started. 🧾
WordPress thank you page with poll or quiz results
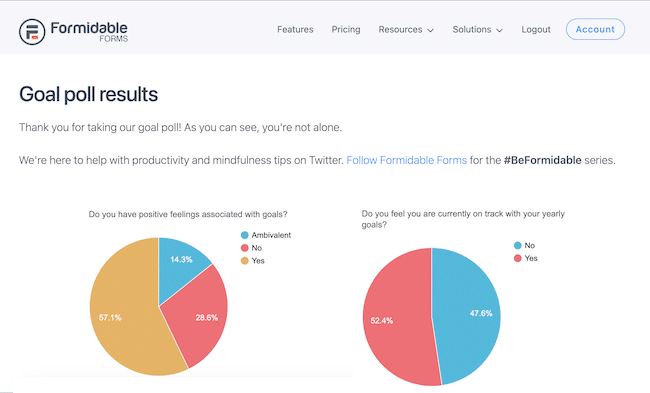
And finally, on our own website, FormidableForms.com, we’ve created a cool thank you page in WordPress to show poll results as soon as a user submits their answers!
👉 Learn how to create your own survey in WordPress
How to create a thank you page in WordPress
There are a few steps to to create a thank you page in WordPress:
Building the thank you page itself is the easy part! Getting it to display when you want it is where it gets tough.
That is unless you use a little plugin called Formidable Forms!
What makes Formidable the best WordPress plugin for making thank you pages? Let’s see…
- A drag and drop form builder
- eCommerce integrations (including WooCommerce)
- Integrations with all the top email marketing services
- Options to show a simple success message, redirect to a different page, or display the content of an existing page
- A form builder that can also work as a landing page builder
You can do all this with the free version of Formidable Forms, too! There's no need to buy a license key like with SeedProd or other paid landing page plugins.

Sounds great, right? Now, you can browse thank you page templates on WordPress for ideas, install the WordPress plugin, save, and start editing.
Here’s how to set up a thank you page in WordPress once you’ve installed and activated Formidable.

Step 1: Install and activate Formidable Forms
If you don't already have the free version of Formidable Forms installed on your site, do that first. That’s right. You can use our free plugin to create a custom thank you page for WordPress!
- On your WordPress Dashboard, go to Plugins → Add New.
- Search for 'Formidable', then click the Install button. Once it’s installed, click the Activate button.

Step 2: Create your custom thank you page in WordPress
This is the fun part! It’s time to get creative and make your custom thank you page exactly like you’d create any other WordPress page.
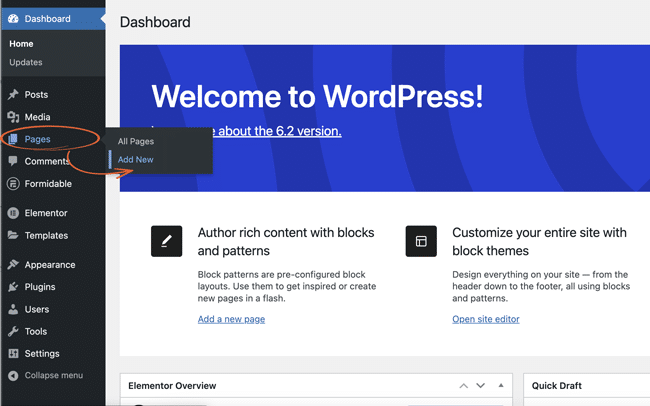
From your WordPress dashboard, head to Pages → Add New.
Next, you can design your thank you page using the WordPress default block editor or a page builder like Elementor or Divi.
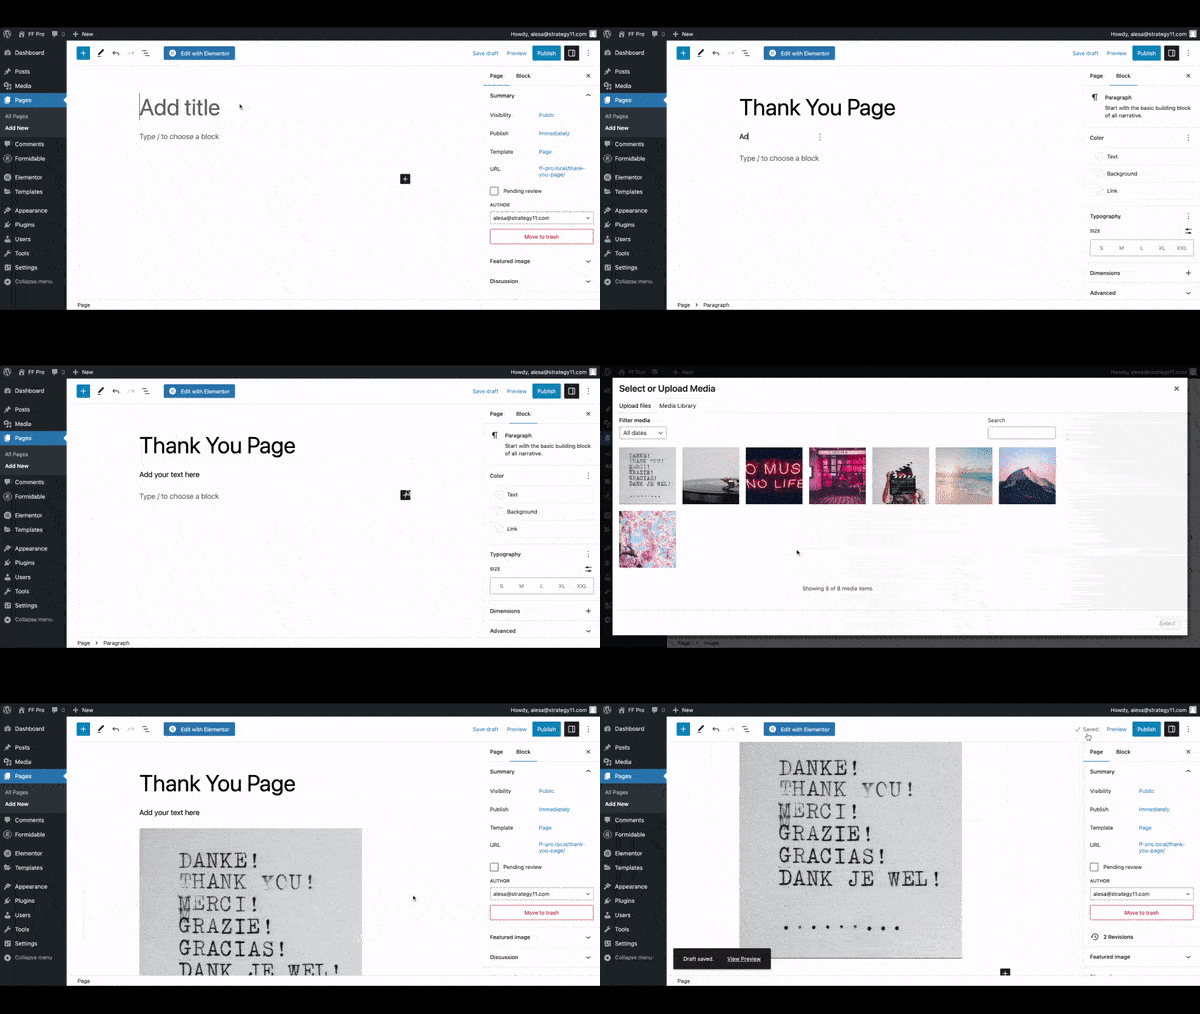
Add text, images, a video, a CTA, or whatever else you’d like to display on your thank you page after form submission.
Once you’re happy with your page template, save the page. If you want it to be accessible to all, you can publish it publicly.
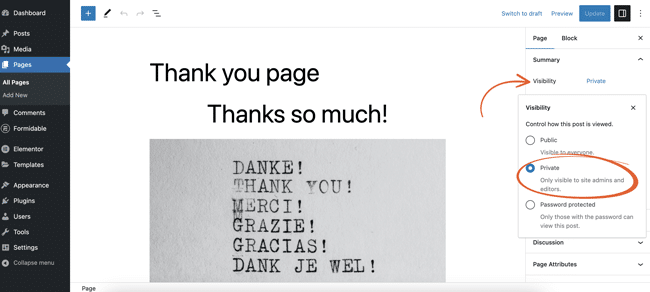
Don’t want your thank you page to be publicly visible? Under the ‘Visibility’ page settings tab, select ‘Private.’ Your content will only be shown to users who have submitted your form.
You can see step-by-step how we set up a thank you page in WordPress in this short video tutorial:

Step 3: Create your form
Whether you want to create a simple contact form or use a lead magnet to grow your email list, you can quickly and easily make your form with Formidable’s visual form builder.
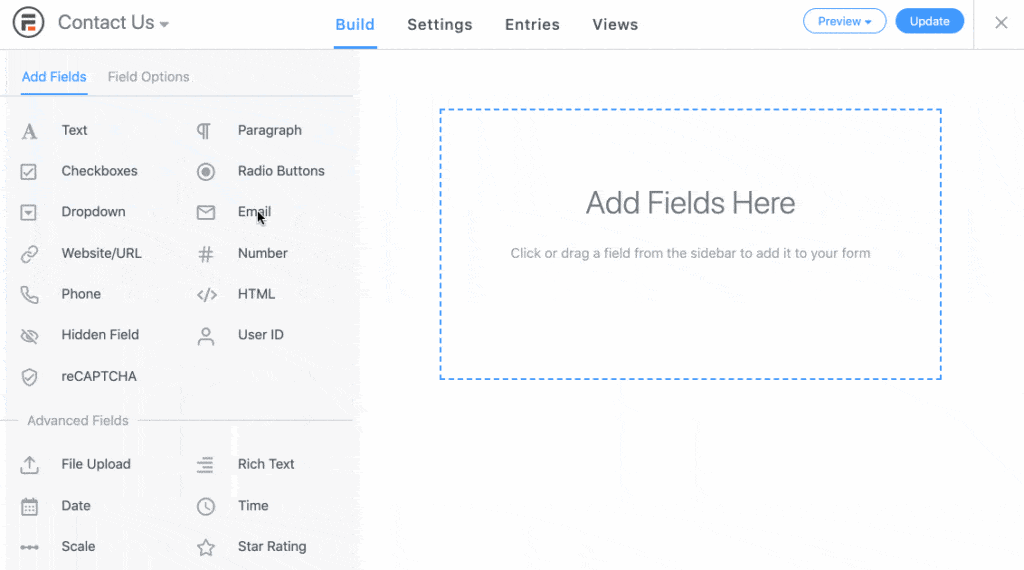
Select a field type on the left, then drag and drop it into your form on the right side of the screen. When you’re done building your form, click the blue Update button to save your changes.
Don’t want to start from scratch? We have 225+ WordPress form templates you can use!
Step 4: Set up your form actions
Now it’s time to set up your WordPress form success confirmation actions.
Click the Settings tab at the top of the page from within any form. Under Actions & Notifications, select ‘Confirmation.’
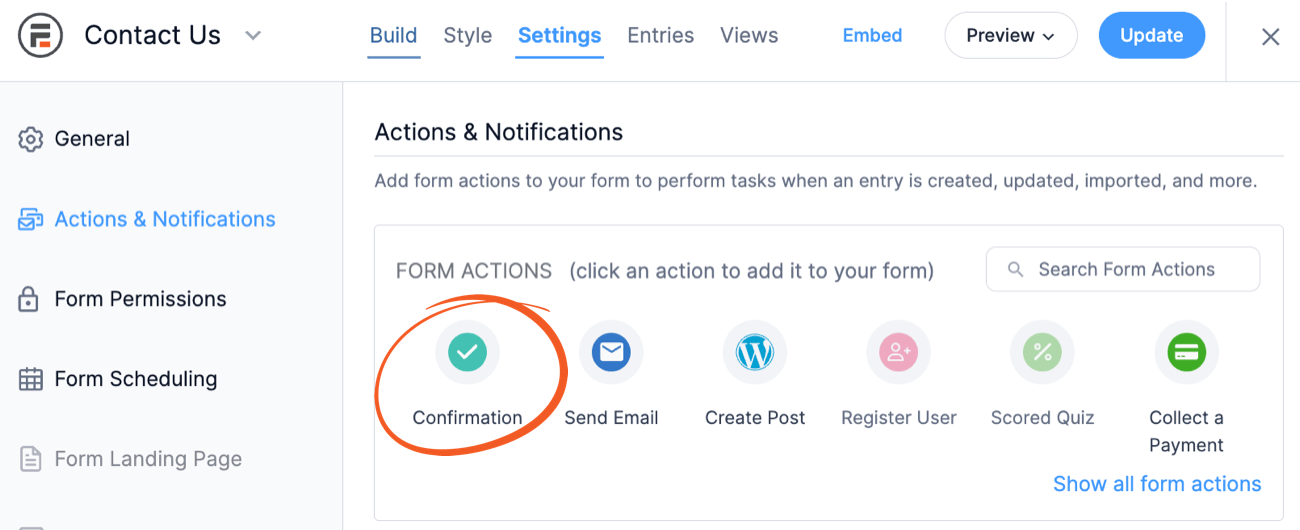
When you scroll down to the Confirmation section, you'll see three different options for your form confirmation action:
- Show confirmation message
- Redirect to URL
- Show page content
Since you want to use your newly created thank you page for WooCommerce or otherwise, you’ll want to choose either Redirect to URL or Show Page Content.
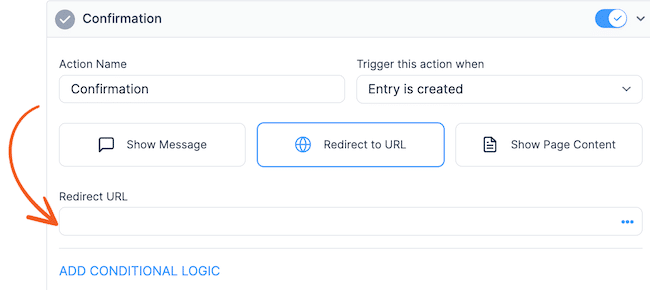
If you choose Redirect to URL, the user will be sent to another page on your website as soon as the form is submitted. The page will need to be publicly visible.
Choosing Show Page Content will keep the user on the same page, and after submission, the content of whichever page you choose will be displayed in place of the form.
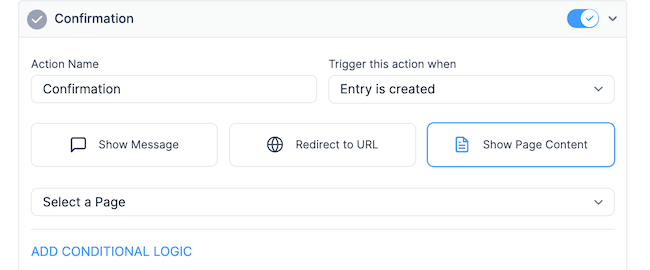
Once you're done, click Update to save your changes.
Now it's time to share your form with the world and put that thank you page into action!
Step 5: Publish your form
All that’s left is to insert your form wherever you want it to appear on your website.
In your WordPress dashboard, ‘Edit’ the page or post where you want to show the form. Add a new WordPress block and type in Formidable to find the Formidable block. Then, pick the form you want to use from the dropdown menu and update your page or post.
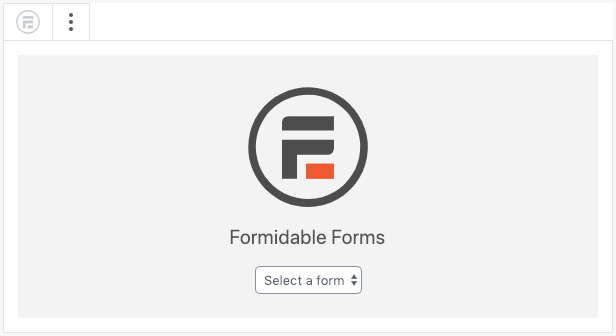
Congrats, your form is now on your website! Submit a test form entry, and you’ll see your custom WordPress thank you page!
How will you use WordPress thank you pages?
Now that you’ve created your form and seamlessly integrated your thank you page, what else would you like to do with it?
Whatever it is, Formidable Forms provides cool features and powerful automation to make it possible.
Connect your form to your email marketing platform to automatically update your contact list, instantly send a personalized auto-reply email, generate a custom PDF from form entries, and more.
And for more WordPress tips and tricks, don’t forget to follow us on social media! You can find us on Facebook, Twitter, and YouTube.
 4 WordPress Landing Page Best Practices for Powerful Results
 6 Best WordPress Landing Page Plugins (to Get Conversions Now!)
 How to Make a Good Landing Page with Forms
Leave a Reply