Want an easy way to add a WordPress fundraising thermometer to your site? This step-by-step guide will show you how to add one — no code needed!

Approximate read time: 8.5 minutes
Do you know how much a WordPress fundraising thermometer enhances your donation efforts?
Adding a fundraising thermometer is a practical and effective method to track progress, raise funds, and motivate donors to donate to any fundraiser. Whether you're running a nonprofit or a fundraiser for a cause — adding one to your site is necessary.
That's why I'm here to show you how to create a fundraising thermometer in WordPress easily and quickly.
So, let's get started.
What is a fundraising thermometer?
Think of a fundraising thermometer like the kind you see for a school fundraising campaign — but on a website!
It's an engaging way to show how much money has been raised and how close someone is to reaching a fundraising goal. As the donations come in, the donation thermometer "fills up."
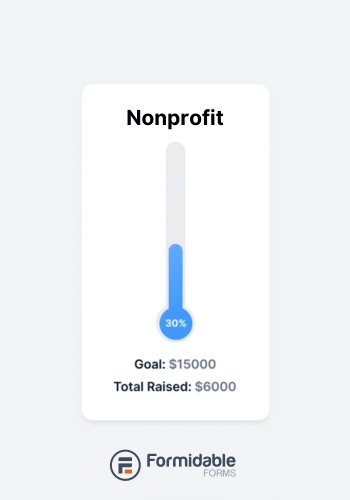
Here's where you might see them:
- Nonprofit websites: To support ongoing programs or specific campaigns.
- Crowdfunding Pages: To track progress towards a project goal.
- Time-Sensitive Causes: To create urgency around disaster relief or emergency funding.
They're a powerful tool for motivating people to give and making the donation process more engaging.
Why use a fundraising thermometer in WordPress?
Fundraising thermometers aren't just for looks.
They actually make people want to donate more! Whether it's a subtle mind trick or just wanting to be a part of a group, fundraising thermometers work.
And here's why:
- See progress: Watching the thermometer inch its way toward the goal is exciting. And that motivates people to help!
- Social proof: Think about it. When people see an empty or full restaurant, which do they choose? They pick the full one! It's the same for charity. When people see others donating, it encourages others.
- Adds urgency: As the thermometer approaches the goal, people need to see it finish (see the above reason) and want to help reach it. So, as the goal gets closer, more people feel the urgency to join.
Setting up a fundraising thermometer usually requires hours of coding. Even then, it might not work as expected.
There are WordPress plugins that can do the same thing faster. For example, WordPress donation plugins, goal trackers, and even WordPress fundraising thermometer plugins exist. And they'll do the job, but you likely have to pair a few of them together to get what you're looking for.
But there is a better option that can be your entire fundraising solution. And it even has a WordPress fundraiser template!
That plugin is Formidable Forms.

How to create a WordPress fundraising thermometer
I recommend using Formidable Forms Pro to add a fundraising thermometer to a website.
It's the best WordPress form builder, so accepting donations is fast and easy. It also connects with popular payment gateways (like Stripe and PayPal) to process payments securely. And its Views add-on allows you to create the fundraising thermometer that donors love.
Plus, with Formidable's WordPress application templates, creating a fundraising thermometer only takes six simple steps:

Step 1: Install and activate Formidable Forms
Formidable Forms is the best WordPress form plugin on the internet.
With it, you can easily create donation forms, accept payments with Stripe or PayPal, and even show the form information on your website! That's where the fundraising template comes in. It's done much of the hard work for you already, and it only takes small changes to personalize it for your situation.
So grab one of the premium versions (Business plan or above) for this WordPress form maker.
Then, install and activate Formidable Forms Pro. Next, you need the WordPress application builder add-on, one of Formidable's most powerful.
Views is the workhorse behind the whole operation. And it's what takes the form data (aka the donations) and displays it in a beautiful fundraising thermometer. So, to add it, go to Formidable → Add-Ons and click Install on the Visual Views plugin.
Step 2: Install and activate a payment add-on
While you're in the Add-Ons section, you can add your payment method.
The Formidable plugin supports multiple payment gateways, like Stripe, PayPal, and Authorize.net. So you can accept seamless donations securely, no matter your choice.
I recommend using Stripe because of its convenience and because it's one of the best ways to accept donations on WordPress. Plus, it accepts many payment types, from credit and debit cards to digital wallets like Google Pay or Cash App.
In this example, I'll be using Stripe.
You can find the WordPress Stripe Plugin and click the Install button for it, too.
Next, go to Formidable → Global Settings → Stripe tab on your WordPress site, and click the Connect to Stripe button under Test. This will be temporary to test it out, but you must do it again under Live once it's ready.
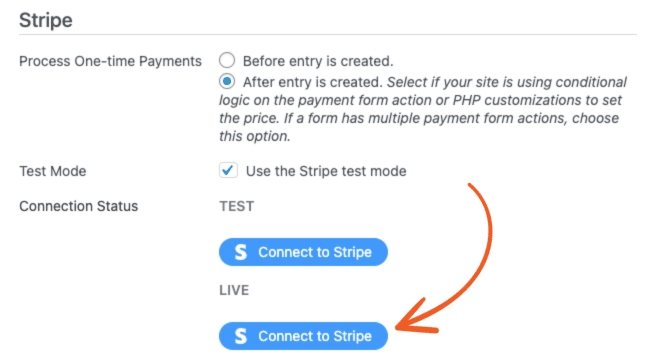
The plugin redirects you to the Stripe onboarding wizard, where you can sign in with an account or create one if you don't. Then, after completing the steps in the Stripe wizard, it automatically redirects you back to your website.
To check that the connect worked, look for a green check with the text Connected next to Connect Status.

Step 3: Add the charity tracker application template
The fundraiser application does all the heavy lifting for you so you can focus on the tasks that need it the most. Let me show you what I mean.
First, go to Formidable → Applications.
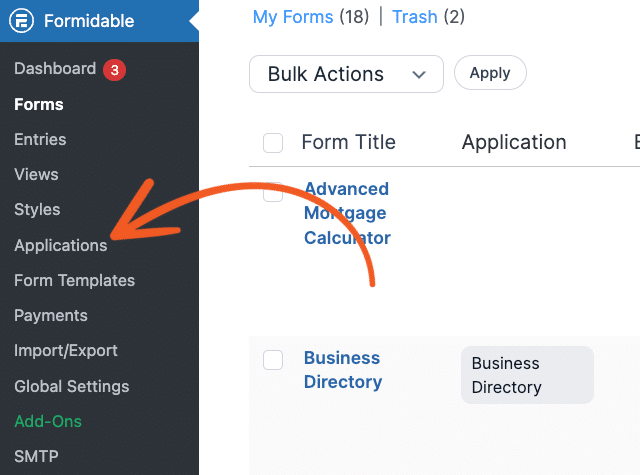
Under Application Templates, search or find the Charity Tracker template. Click on the template, and click the Install Application button.
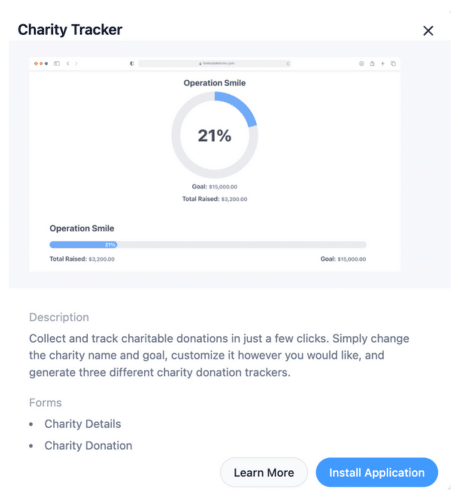
Next, name the application and click Install Application again. The plugin shows the different parts of the application — forms, views, and pages. With these parts, you already have a working application. It just takes some small changes and displaying them to get it to work for any charity.
Last, click Open Application to begin editing.
Step 4: Set your charity and goal
Your application has seven parts.
- Two forms (Charity Details and Charity Donation)
- Three Grid Views (Thermometer, Circle, and Horizontal progress bars)
- Two pages (Charity Donation Submission and Charity Progress Trackers)
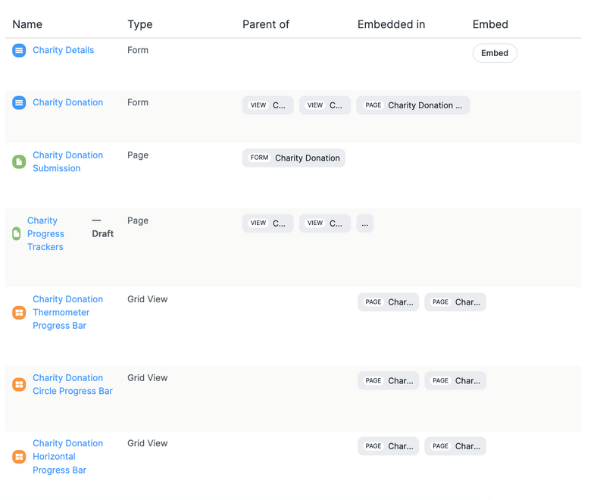
First, choose the Charity Details form. This form is where you enter the Charity Name and Charity Goal. This is for internal use, so customers won't see this.
Click the Entries tab at the top of the drag and drop form builder. Next, click the My Charity entry.

Then, you simply need to edit the name of the charity under Charity Name and the target goal under Charity Goal.
I'm changing my charity to Operation Smile, so feel free to adjust yours as well.
Last, click Update.

Next, let's verify your charity is loaded into the Charity Donation form.
So, go back to your application and choose the form. You should see the charity under Charity: as a Dynamic Field.
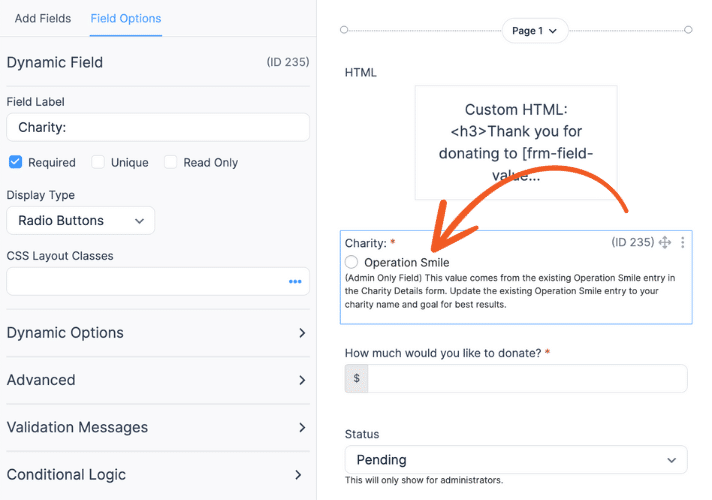
If not, check the Dynamic Options section in the left-hand panel. Your settings should match this:
- Load Options From: Form Entries
- Select a Form: Charity Details
- Select a Field: Charity Name
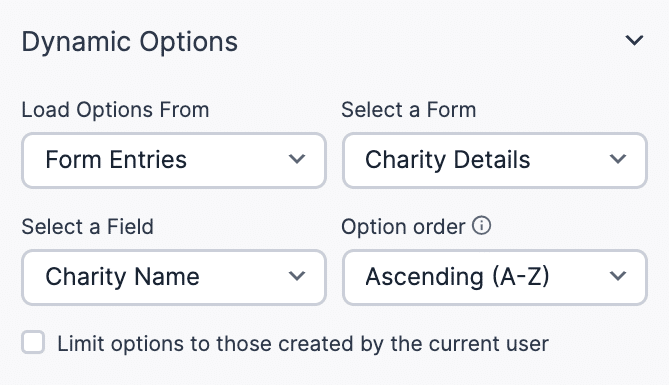
If this is set correctly, any entries you have in the Charity Details will show.
Lastly, you'll see the Status field. This is only for donation management.
Donors won't see this when they donate, but you must return to the Entries screen to set this from Pending to Approved so the donations show on the thermometer.
Step 5: Display your donation form
Next, you need a page for your donation. Luckily, Formidable Forms has already created one for you in the application.
Go to your application dashboard and click the Charity Donation Submission page.
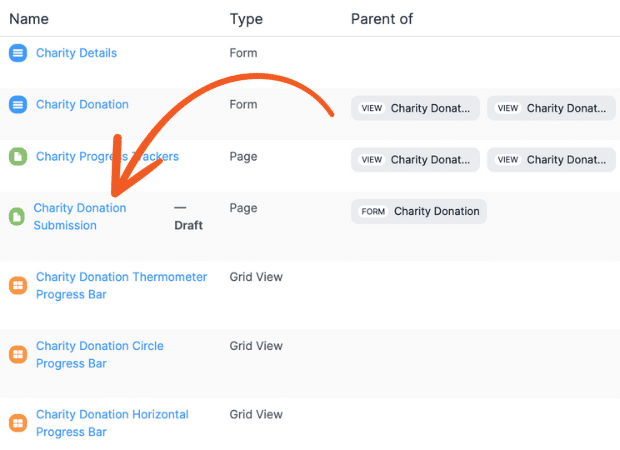
This page has everything created, including a nice message above the form for potential donors.
Currently, it's set to a draft. But you can publish and direct donors to the new URL to save time.
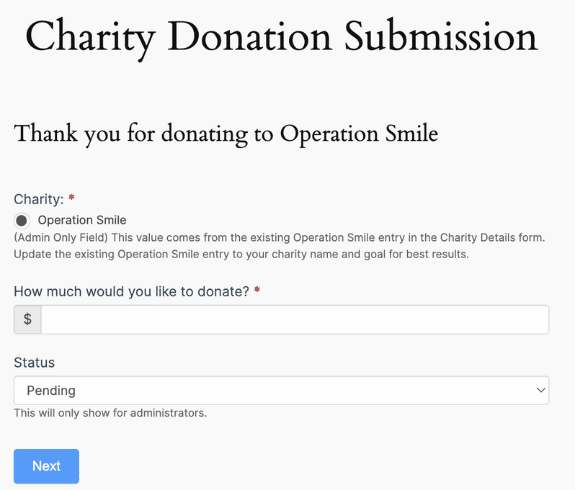
If you prefer to put the form on an existing page, you can add a new WordPress block and find the Formidable Forms WordPress block.
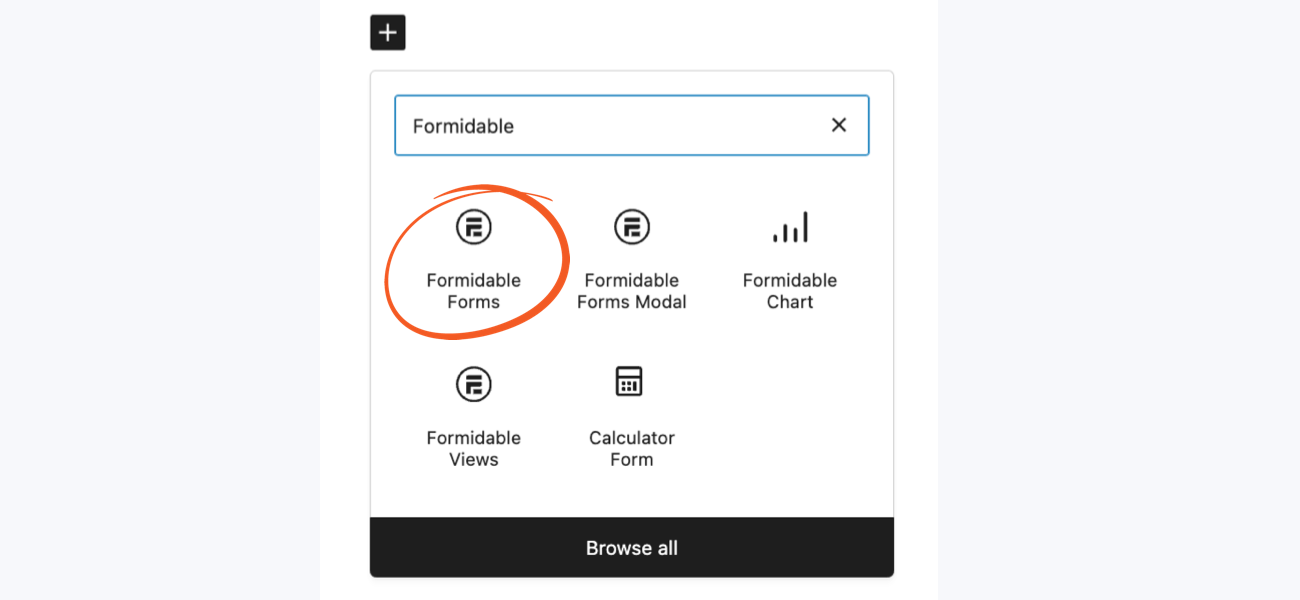
Next, choose your Charity Donation form from the dropdown displayed in the block.
Last, update your page so that your form is live. Now you can start accepting donations and filling up that thermometer.
Oh, and speaking of the thermometer. Let's set it up.
Step 6: Display your fundraising goal thermometer on the website
Head back to your application in the Formidable dashboard by going to Formidable → Applications and choosing your application.
You have three choices for your donation progress bar: Thermometer, Circle, and Horizontal.
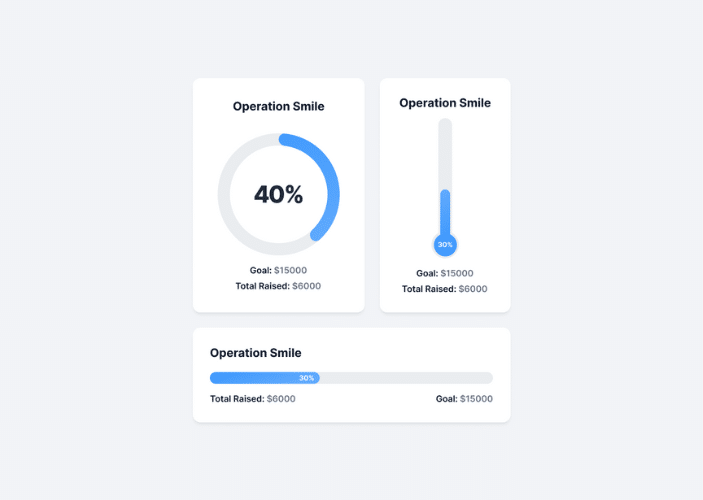
You can click each progress bar to view it in the Formidable Views editor. So feel free to check them out to see which you like best.
But if you're looking for an actual thermometer template, choose the Thermometer option.
When you choose one, you can show it on your site using two methods:
- A piece of shortcode
- Using a WordPress block
If you'd like to use the shortcode, click the Embed button next to the progress bar in the application dashboard.
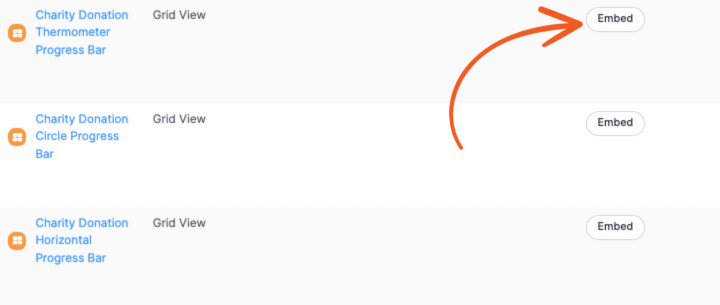
Next, you can embed it on an existing page, create a new one, or copy the shortcode manually so you can choose where to put it.
The other option is using the Formidable Views WordPress block.
Like the donation form earlier, you can go to any post or page to display your view. Then, you can add a new WordPress block and search for Formidable Views. Also, like the form, you can choose your View from the dropdown.
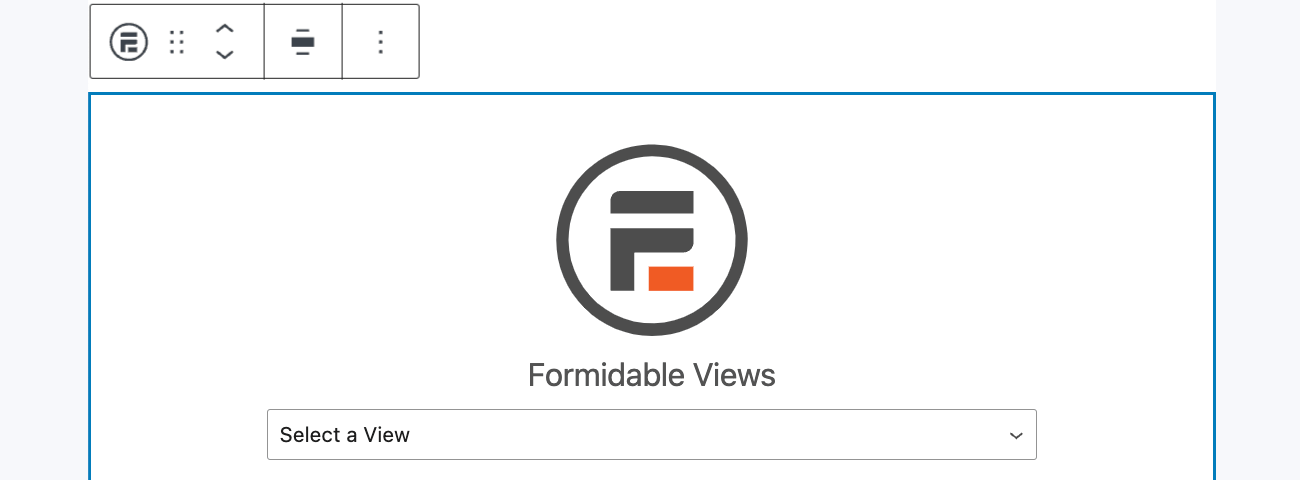
Last, update your page or post and the entire fundraising application is ready!
As donations roll in (and someone sets the status to approved), the thermometer will update in real time!
Next steps: Set up recurring donations
This is just a taste of what you can do with Formidable Forms and its low code application platform.
From application templates (like this one) to save time and headaches to giving you the tools to customize it even further, Formidable helps you build applications that scale.
But this isn't all it can do. Next, I recommend learning how to set up recurring donations on a WordPress website. That way thermometer doesn't have to be used once, and then it's finished. Instead, you can use it repeatedly to reach all your charity goals!
Join our community on Facebook, Twitter, and YouTube for more WordPress tips and tricks!
 7 Best Payment Processors for Nonprofits
 The 10 Best Donation Plugins for WordPress
 10 Best PayPal Donation Plugins for WordPress
This is a great addition to the Formidable Stable of useful add-ons;
I am wondering if I can use this for a Charitable Campaign where the donation are done elsewhere, and need to just update the amount manually.
Would this be simply be
- Not publishing the form
- Adding a value to the form submission manually
- Displaying the View
Hey Daveed,
Of course, you can use the template without the payment action and manually submit the value of the donation.
A versatile feature and use case. Especially for non-profits or others who raise funds regularly.
I didn't know there was a visual thing we could do like this for raising dough! I've been using formidable for many years now and it always is my go to for solving almost anything that would otherwise need a different plugin. Thanks!